
Page 32 - MSDN Magazine, November 2018
P. 32
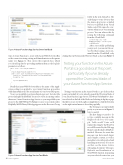
Figure 4 Azure Function App Service Overview Blade
typeofAzureFunctiontocreatewithAzureWebJobsServiceBus as the connection string setting and dimsubmission as the queue name (see Figure 3). This creates the required class, which you should update by providing myQueueItem as the log.Info parameter, as follows:
public static class OvaryVisSubmitProc {
[FunctionName("OvaryVisSubmitProc")]
public static async Task Run([ServiceBusTrigger("dimsubmission",
Connection = "AzureWebJobsServiceBus")]string myQueueItem,
TraceWriter log) {
log.Info(myQueueItem)); }
}
Recall that AzureWebJobsServiceBus is the name of the Appli- cation setting you applied to your Azure Function app earlier, while dimsubmission is the actual name of your Service Bus queue.
Now you can publish your Azure Function project. Just select the project and right-click Publish. You need to select an existing (rather than new) Azure Function App Service so you can publish your project to the MSDNOvaryVisFnApp resource you created earlier. Helpfully, MSDNOvaryVisFnApp appears in the Resource Group
folder in the next dialog box. The only thing to worry about is that the Azure App Service is halted before you publish from Visual Studio, as its DLLs cannot be over- written when in use by a running process. You can achieve this by issuing the following command from the Cloud Shell:
az functionapp stop --name MSDNOvaryVisFnApp --resource-group resMSDNOvaryVis
After successfully publishing your project, you can start the ser- vice by either issuing a start com- mand from the Cloud Shell, or by
clickingthestartbuttonintheOverviewblade,asshowninFigure4.
Testing your function in the Azure Portal is a good idea at this point, particularly if you’ve already opened the Overview blade of your Azure Function App Service.
Testing your function in the Azure Portal is a good idea at this point, particularly if you’ve already opened the Overview blade of your Azure Function App Service. The OvaryVisSubmitProc func- tion is listed on the left of the blade, and selecting it displays a page that allows you to test it, though you might have to click the Test item on the right vertical menu to show this page fully.
The Test page is not particularly pretty, as you can see in Figure 5, but it is useful.
The first thing you need to do is type a suitable message in the Request body box—for exam- ple, “hello world.” Later we’ll replace this string by the OvaryVis record ID created by the Web app HomeController.Index (HttpPost) method. However, be aware this message can have much larger and complex content, as well as metadata to describe payload and handling instructions (for more on that, see the Azure Service Messaging document, “Messages, Payloads, and Serialization,” at bit.ly/2OCnIjX). Indeed, depending on your selected service tier, you
Azure Service Bus
Figure 5 Azure Function App Service Test Blade 26 msdn magazine
