
Page 30 - MSDN Magazine, November 2018
P. 30
how you’ll be billed for usage, though for a project of this nature the cost should be almost nothing.
Microsoft’s intention is that you create Azure Functions with- out having to explicitly provision a server to run them—known as serverless execution. Microsoft uses consumption plans to bill customers based only on how often a function executes, how long ittakestoexecuteandhowmuchmemoryituses.Yes,youcanget a fixed-priced bill by electing to run your Azure Functions app ser- vice on the same virtual machine (VM) as your Web app, but this option isn’t available for Web apps that use shared infrastructure. As a result for this project, it was cheaper to use a consumption plan than to upgrade my Web app service plan.
Now let’s apply application settings to the new Function app to complete the provisioning step. Note that you must replace the con- nection value MMM with the one for your Service Bus, by copying the RootManageSharedAccessKey primary connection string from
its Shared access policies blade in the Azure Portal. Here’s the code:
az functionapp config appsettings set --name MSDNOvaryVisFnApp --resource-group resMSDNOvaryVis --settings
'AzureServiceBusQueueName=dimsubmission'
az functionapp config appsettings set --name MSDNOvaryVisFnApp
--resource-group resMSDNOvaryVis --settings 'AzureWebJobsServiceBus=MMM’ az functionapp config appsettings set --name MSDNOvaryVisFnApp
--resource-group resMSDNOvaryVis
--settings 'FUNCTIONS_EXTENSION_VERSION=2.0.12050.0'
Of course, in production code you would create an additional key in the Shared access policies blade with just send privileges, and then use its connection string instead of the one from the root key. You also should be aware that your Azure Function executes on a common runtime, which may change if there’s an update unless you define a particular version using the FUNCTIONS_ EXTENSION_VERSION setting.
I discovered the need to specify my runtime the hard way, as Microsoft updated the pre-release runtime I was working with soon after I completed the development work for this article, causing my function to suddenly stop working. Fortunately, I was
able to force Azure Functions to employ a specific runtime version to ensure that my function would only be executed on a server with the same runtime used during development. I don’t expect such breaking changes to happen now that the runtime has entered its beta releases, but it’s something worth knowing. You can see the runtime version for your own functions by visiting the Azure Function app settings blade in the Azure Portal.
Implementing an Azure Function App Service
The Azure Function needed to perform your Web site’s background processing will be developed from a Visual Studio Azure Function app project. The required template is installed on your PC as part of the .NET Core 2.1 SDK and the Web development workload.
Microsoft’s intention is that you create Azure Functions without having to explicitly provision a server to run them—known as serverless execution.
Creating an Azure Function project takes less than a minute. First open the New Project dialog (File | New Project), select Azure Functions from the Cloud template folder in Visual C# and pro- vide a suitable name for your project (OvaryVisFnApp), making sure Add to Solution is selected. In the next dialog provide the type of project (in this case, Empty) and select the storage account you just created. The new OvaryVisFnApp Project will then appear in your Solution Explorer together with an initial set of files.
Now is a good time to make sure you have the latest versions of the packages needed for the project. These are as displayed in the NuGet Solution window when you click Tools | NuGet Package Manager | Manage NuGet Packages for Solu- tion. I used the following for this article, but you might want to try later versions for your own work: • NETStandard.Library v2.0.3
• Microsoft.NET.Sdk.Functions
v1.0.19
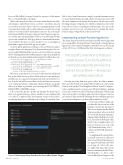
To implement the Azure Func-
tion itself, you need to add a new class to your OvaryVisFnApp proj- ect. Again Visual Studio provides good support. Select the proj- ect, right-click Add | New Azure Function and name the file Ovary- VisSubmitProc.cs. Next, select Service Bus Queue Trigger as the
Azure Service Bus
Figure 3 Creating an Azure Function for Service Bus Queue Trigger 24 msdn magazine
