
Page 33 - MSDN Magazine, November 2018
P. 33
can create Service Bus queues able to hold up to 80GB of messages with each message being up to 1MB in size.
Once you’ve created the Request body text in the Test page, you need to click Run to simulate an event being sent to your Run func- tion. The processing of this event can be seen in the Log window, shown at the bottom of Figure 5. You should note that the value of the data field in the log is the same as that in the request body. When your function returns, it will cause a Status 202 Accepted message to appear in the Test page. This indicates that your func- tion and the Azure Function App Service are working correctly.
Sending Messages to the Service
Bus Queue from a Web App
It’s presumed that you’ve already built a Web app like the one described in the accompanying online article. It just needs to have two Controller methods that handle the creation of a view with a simple form and its subsequent posting back to the Web app. In our case that’s a HomeController with Index methods for HttpGet and HttpPost.
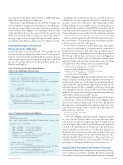
Figure 6 Setting Up the Service Bus Queue Client in the Web App’s Startup Class
Installing Azure.ServiceBus package in your Web app project will allow it to use the component needed for sending an event message to your Service Bus queue. The Visual Studio NuGet Package Manager Console enables you to add such packages, as described in Microsoft Docs at bit.ly/2QIiOmZ. You should open the console from the Tools menu (Tools | NuGet Package Manager | Package Manager Console) and then issue the following command:
Install-Package Microsoft.Azure.ServiceBus -Version 3.1.0 -Project OvaryVisWebApp
This also installs dependencies like WebJobs.Extensions.Service- Bus (3.0.0-beta8), so you should now have everything you need to send messages to your Service Bus queue.
Now it’s time to set up the Service Bus queue client. This requires you to pass to it the name of your queue and its connection. I found it more convenient to keep these values as application con- figuration settings, so I initialized the Service Bus queue client in the Web app’s Startup class constructor, as shown in Figure 6. I then used the Cloud Shell to give the following commands, again replacing MMM with the same Service Bus connection string used previously when setting up the Azure Function app:
az webapp config appsettings set --name MSDNOvaryVisWebApp --resource-group resMSDNOvaryVis --settings
'OvaryVisServiceBus:QueueName=dimsubmission'
az webapp config appsettings set --name MSDNOvaryVisWebApp
--resource-group resMSDNOvaryVis --settings 'OvaryVisServiceBus:Connection=MMM'
You’ll see in Figure 6 that the queue client is held in a static variable, which is initially set as null and then initialized by the SetupSer- viceBus method. The use of lock makes this method thread safe, while testing that _queueClient is null avoids more than one cli- ent being constructed. This is overkill for a Web app as the Startup class is initialized only once, but it does allow the SetupServiceBus method to be copied to the Azure Function you’ll create in the next article, where such protection will be needed.
Next, I need to update the HttpPost Index method of the Home- Controller class so that its code is like that shown in Figure 7. This allows you to send an event message to your Service Bus queue in the same way you did using the Azure Function App Service Test page. However, you also need to add the following using state- ments at the top of the file:
using Microsoft.Azure.ServiceBus; using System.Net.Http;
You’ll see from Figure 7 that after initially saving the form data as a record in the OvaryVis table, you create a Message object with its body set as the record ID string. After you build and run your Web App locally (Ctrl+F5), the Result page will display Job Created as its StatusMsg upon submission of the Index page’s form. In addition, you’ll see the record ID value displayed in the Portal’s Azure Function log. This indicates that you have not only succeeded in saving a record to the database, but you’ve also transmitted its ID to the Azure Function. All you need to do now is update your Azure Function so it uses this ID to read the corre- sponding record from the database in the Azure Function.
Adding Entity Framework to the Azure Function
Entity Framework provides a simple way of retrieving the Ovary- Vis record from your database using the ID value passed in the Service Bus event message. Implementation involves adding the
public class Startup {
private static IQueueClient _queueClient = null;
private static readonly object _accesslock = new object();
private static void SetupServiceBus(string connection, string queueName) {
lock (_accesslock) {
if (_queueClient == null)
_queueClient = new QueueClient(connection, queueName);
} }
public static IQueueClient GetQueueClient() { return _queueClient; } public Startup(IConfiguration configuration)
{
Configuration = configuration; SetupServiceBus(Configuration["OvaryVisServiceBus:Connection"],
Configuration["OvaryVisServiceBus:QueueName"]); }
}
Figure 7 HomeController Index Method
[HttpPost]
[ValidateAntiForgeryToken]
public async Task<IActionResult> Index([Bind("Id,D1mm,D2mm,D3mm")] OvaryVis form) {
OvaryVis record = new OvaryVis {
D1mm = form.D1mm, // First ovary dimension D2mm = form.D2mm, // Second ovary dimension D3mm = form.D3mm, // Third ovary dimension JobSubmitted = DateTime.UtcNow,
ResultVis = -1, // Result code: -1 = not yet processed StatusMsg = String.Format("Job Created at {0}",
DateTime.UtcNow.ToString("HH:mm:ss")) };
// Add record to database _context.Add(record);
await _context.SaveChangesAsync();
// Send message with ID value to Service Bus Queue
var message = new Message(Encoding.UTF8.GetBytes(record.Id)); await Startup.GetQueueClient().SendAsync(message);
// Call Result method to return Result page return RedirectToAction("Result", new { id = record.Id });
}
msdnmagazine.com
November 2018 27
