
Page 15 - MSDN Magazine, February 2018
P. 15
ArtificiAlly intelligent FRANK LA VIGNE Using Jupyter Notebooks
The Jupyter Notebook is an open source, browser-based tool that allows users to create and share documents that contain live code, visualizations and text. Jupyter Notebooks are not application development environments, per se. Rather, they provide an inter- active “scratch pad” where data can be explored and experimented with. They offer a browser-based, interactive shell for various programming languages, such as Python or R, and provide data scientists and engineers a way to quickly experiment with data by providing a platform to share code, observations and visualizations. Notebooks can be run locally on a PC or in the cloud through var- ious services, and are a great way to explore data sets and get a feel for a new programming language. For developers accustomed to a more traditional IDE, however, they can be bewildering at first.
Structure of a Jupyter Notebook
Jupyter Notebooks consist of a series of “cells” arranged in a linear sequence. Each cell can either be text or code. Text cells are formatted in MarkDown, a lightweight markup language with plain text format- ting syntax. Code cells contain code in the language associated with the particular notebook. Python notebooks can execute only Python code and not R, while an R notebook can execute R and not Python.
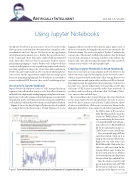
Figure 1 shows the IntroToJupyterPython notebook available as a sample file on the Data Science Virtual Machine. Note the
language indicator for the notebook in the upper right corner of the browser window, showing that the notebook is attached to the Python 2 runtime. The circle to the right of “Python 2” indicates the current state of the kernel. A filled circle indicates that the kernel is in use and a program is executing. A hollow circle indicates the kernel is idle. Also take note that the main body of the notebook contains text as well as code and a graphed plot.
Creating a Jupyter Notebook in Azure Notebooks
There are several options to run a Jupyter notebook. However, the fastest way to get started is by using the Azure Notebook service, which is in preview mode at the time of this writing. Browse over to notebooks.azure.com and sign in with your Microsoft ID credentials. If prompted, grant the application the permissions it asks for. For first time users, the site will prompt you for a public user ID. This will create a URL to host your profile and to share notebooks. If you do not wish to set this up at this time, click “No Thanks.” Other- wise, enter a value and click Save.
The screen will now show your profile page. The Azure Notebook service stores Jupyter Notebooks in Libraries. In order to create a notebook, first you must create a library. Under Libraries, there’s a button to add a library. Click on it to create a new library. In the dialog box that follows, enter a name for the Library and an ID for
Figure 1 Tutorial Notebook Introducing the Core Features of a Jupyter Notebook
the URL to share it. If you wish to make this library public, check the boxnextto“PublicLibrary.”Check- ing or unchecking the box next to “Create a README.md” will auto- matically insert a README.md file for documentation purposes. Click Create to create a new library.
Now, your profile page will have one library listed. Click on it to bring up the contents of the library. Right now, the only item is the README.md file. Click on the New button to add a new item. In the ensuing dialog, enter a name for the new item and choose Python 3.6 Notebook from the drop down list next to Item Type and click New.
Once the item is created, it will appear in the library with a .IPYNB file extension. Click on it to launch an instance of the Jupyter server in
February 2018 11
