
Page 54 - MSDN Magazine, April 2018
P. 54
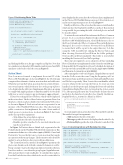
Figure 5 Partitioning Photo Titles
items displayed in the action sheet. RowSelection class is implemented in the Photos.iOS.WatchKitExtension project (RowSelection.cs) and its most important parts are shown in Figure 6.
Finally, each button of the action sheet has an associated handler, which invokes the DisplaySelectedPhotos method. This method is responsible for presenting the table of selected photos and will be described later.
To activate the action sheet I first reference the Photos.Common project. To do so, in Solution Explorer I right-click References of the Photos.iOS.WatchKitExtension, select Edit References, choose the Project tab and select Photos.Common. Once in the Reference Manager I also need to reference Newtonsoft.Json.dll library to ensure that it will be copied to the output directory. I do this using the .NET Assembly tab, clicking the Browse button and then choosing Newtonsoft.Json.dll from the folder packages/ Newtonsoft.Json/lib/netstandard20. This folder is created after installing the Newtonsoft.Json NuGet package.
These steps are required to access a shared code base (including PhotosClient that was implemented earlier) from the watchOS app. I then modify the UI using the storyboard. A detailed description of how layout works in watchOS can be found in Apple (apple.co/2FlzADj) and Xamarin documentation (bit.ly/2EKjCRM).
After opening the storyboard designer, I drag the Button control from the Toolbox onto the scene. Using the Properties pad, I set the button’s Name and Title properties to ButtonDisplayPhotoList and Get list, respectively. Then, I create the event handler, which executes whenever the user taps the button. To create an event handler, I use the Properties pad, clicking the Events tab and then typing ButtonDisplayPhotoList_Activated in the Action search box. After pressing the enter key, Visual Studio declares the new method in the InterfaceController class. Finally, the Button- DisplayPhotoList_Activated is defined as follows:
partial void ButtonDisplayPhotoList_Activated() {
PresentAlertController(string.Empty, string.Empty, WKAlertControllerStyle.ActionSheet, alertActions);
}
To create and present an action sheet, I use PresentAlertController. This method accepts four arguments:
• Title indicates the title of the alert.
• Message specifies the text to be displayed in the alert’s body. • PreferredStyle specifies the style of the alert controller. Style
Figure 6 Calculating Indices with RowSelection Class
private const int rowsPerGroup = 10; private IEnumerable<Photo> photos; private WKAlertAction[] alertActions;
private void CreateAlertActions() {
var actionsCount = photos.Count() / rowsPerGroup; alertActions = new WKAlertAction[actionsCount];
for (var i = 0; i < actionsCount; i++) {
var rowSelection = new RowSelection( i, rowsPerGroup, photos.Count());
var alertAction = WKAlertAction.Create(
rowSelection.Title,
WKAlertActionStyle.Default,
async () => { await DisplaySelectedPhotos(rowSelection); });
alertActions[i] = alertAction; }
}
and clicking the Play icon, the app compiles and deploys. Note that two simulators are launched: iOS simulator and its paired watchOS simulator (refer back to the left screen in Figure 1).
Action Sheet
Now I can move forward to implement the actual UI of the Photos.iOS.WatchKit app. As shown in Figure 1, the UI of the app comprises three elements: a button, an action sheet and a table view. When the user taps the button, an action sheet is activated. It pres- ents several options, which let the user choose the group of photos to be displayed in the table view. I implemented this photo grouping to comply with Apple’s guidance to limit the number of rows in the table view as a way to improve app performance (apple.co/2Cecrnt).
I’ll start by creating the list of buttons, which will be displayed in the action sheet. The list of these buttons is generated based on the photo collection (photos field) retrieved from the Web service as shown in Figure 5. Each action button is represented as an instance of the WatchKit.WKAction class. This class lacks any public constructors but implements the static Create method, which you use to create actions. As shown in Figure 5, the Create method accepts three arguments:
• Title defines the action button caption
• Style indicates the style of action button
• Handler specifies a method to be executed when the user
taps the action button
In Figure 5 all actions have a default style, represented as the
Default value from the WatchKit.WKAlertStyle enumeration. This enumeration defines two other values (apple.co/2EHCAZr): Cancel and Destructive. You use the first one to create an action that cancels an operation without any changes. The destructive style should be applied to actions that produce irreversible modifications.
The CreateAlertActions method from Figure 5 partitions the photos into chunks, each of which contains 10 elements (rowsPer- Group constant). To get a selected group of photos from the collection, I need two indices—one where the group begins (beginIndex vari- able) and one where it ends (endIndex). To calculate these indices, I use the RowSelection class, which is also used to create titles for
public int BeginIndex { get; private set; } public int EndIndex { get; private set; } public int RowCount { get; private set; } public string Title { get; private set; }
private static string titlePrefix = "Elements to show:";
public RowSelection(int groupIndex, int rowsPerGroup, int elementCount) {
BeginIndex = groupIndex * rowsPerGroup;
EndIndex = Math.Min((groupIndex + 1) * rowsPerGroup, elementCount) - 1;
RowCount = EndIndex - BeginIndex + 1;
Title = $"{titlePrefix} {BeginIndex}-{EndIndex}"; }
48 msdn magazine
Visual Studio for Mac
