
Page 52 - MSDN Magazine, April 2018
P. 52
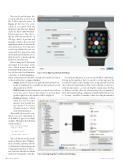
The storyboard designer lets you drag and drop controls from the Toolbox onto the scenes. In Figure 4 I have just one scene, which is associated with the InterfaceController class, defined under the Photos.iOS.WatchKit- Extension project. This class is like the UIViewController for an iOS app—that is, it presents and manages content on the screen and implements methods that handle user interactions. Note that once controls are added to the scene, you can modify their properties using the Properties pad and then access them from the code through the InterfaceController class.
Before editing the UI, let’s briefly
investigate the structure of this
class, which derives from the WatchKit.WKInterfaceControl-
ler—the base class for all interface
controllers. A default implemen-
tation of the InterfaceController overrides three methods related to the view lifecycle (see apple.co/2GwXhrn):
• Awake: Invoked by the system right after the InterfaceCon- troller is initialized. You typically use this method to load data and prepare the UI.
• WillActivate: Invoked when the associated view is about to become active. You use this method to prepare final updates right before the interface will be displayed.
•DidDeactivate: Called when the view becomes inactive. You typically use this method to release dynamic resources, which aren’t needed anymore.
These methods are used to con- figure your view, depending on its visibility. To give you a simple example, I’ll analyze the following Awake method:
public override void Awake( NSObject context)
{ base.Awake(context);
SetTitle("Hello, watch!"); }
This code first invokes the Awake method of the base class (WKInter- faceController) and then calls the SetTitle method, which changes the string displayed in the top-left cor- ner of the view. This title is a default element of each interface controller.
To test this modification, you can execute the Photos.iOS.Watch- Kit app in the simulator. First, you need to set this app (not the extension bundle) as the startup project, using a dropdown from the toolbar in Visual Studio for Mac. Next to that list you have two other dropdown lists—one for selecting the configuration (Debug or Release), and the other for selecting from a list of simulators. Here, I’m using the Debug configuration and the Apple Watch Series 3 – 42 mm – watchOS 4.2 emulator. After choosing the simulator
Figure 3 Configuring the watchOS App
46 msdn magazine
Visual Studio for Mac
Figure 4 Designing the UI of the watchOS App
