
Page 37 - MSDN Magazine, March 2018
P. 37
• Each input control is added using the EditorFor helper, which interprets the metadata on the property to determine the appropriate editor.
The metadata is evaluated at run time. This means that you can add attributes to your model af- ter generating the view and these attributes will be used to deter- mine the validators, labels and editors, as appropriate.
Because the scaffolding is a one- time code generation, it’s OK to edit the generated markup, as that’s generally expected.
Binding to Knockout
To make the generated markup
work with Knockout, I need to
add a couple of attributes to the
generated markup. I won’t delve deeply into the internal workings of Knockout except to note that binding uses a data-bind attri- bute. The binding declaration specifies the type of binding and then the property to be used. I’ll need to add a data-bind attribute to the input controls. Looking back at the generated markup, you see how the class attribute is added. Following the same process, I can modify the EditorFor function, as shown in the code here:
@Html.EditorFor(model => model.StartTime,
new { htmlAttributes = new { @class = "form-control",
data_bind = "text: StartTime" } })
Using the markup generated out of the box from the scaffolding, this is the only change needed to add Knockout binding.
Binding to Angular
Data binding with Angular is similar. I can add either an ng-model attribute or a data-ng-model attribute. The data-ng-model attribute will keep the markup HTML5-compliant, but the ng-bind is still commonly used. In either case, the value for the attribute is simply the name of the property to bind. To support binding to an Angular controller, I’ll modify the EditorFor function, using this code:
@Html.EditorFor(model => model.StartTime,
new { htmlAttributes = new { @class = "form-control",
data_ng-model = "StartTime" } })
There are a couple of more minor tweaks that come into play for defining the application and controller. Please refer to the sample code for the full working example to see these changes in context.
You can adopt a similar technique to make the generated markup work with whatever MVVM framework you’re using.
Changing the Scaffolding
Because scaffolding uses T4 to generate the output, I can change what gets generated to prevent having to edit every View generated. The templates used are stored under the installation for Visual Studio. For Visual Studio 2017, you’ll find them here:
C:\Program Files (x86)\Microsoft Visual Studio 14.0\Common7\IDE\ Extensions\Microsoft\Web\Mvc\Scaffolding\Templates\MvcView
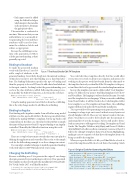
Figure 7 The Visual Studio Edit T4 Template
You could edit these templates directly, but this would affect every project you work on from your computer, and anyone else working on the project would not benefit from the edits made to the templates. Instead, you should add the T4 templates to the proj- ect and have the local copy override the standard implementation.
Just copy the templates you want to a folder called “Code Templates” in the root folder of your project. You’ll find templates for both C# and Visual Basic. The language is reflected in the file name. You only need the templates for one language. When you invoke scaffolding from Visual Studio, it will first look in the CodeTemplates folder for a template to use. If a template isn’t found there, the scaffolding engine will then look under the Visual Studio installation.
T4 is a powerful tool for generating text in general, not just code. Learning it is a large topic on its own, but don’t worry if you’re not already familiar with T4. These are very minor tweaks to the tem- plates. You’ll have no need to delve deeply into the internals to understand how T4 works its magic, but you will need to down- load an extension to add support for editing T4 templates in Visual Studio. The Tangible T4 Editor (bit.ly/2Flqiqt) and Devart T4 Editor (bit.ly/2qTO4GU) both offer excellent community versions of their T4 Editors for editing T4 templates that provide Syntax Highlighting, making it easier to separate code that drives the template from code being created by the template.
When you open the Edit.cs.t4 file, you’ll find blocks of code to control the template and blocks of code that is the markup. Much
Figure 8 Original Code for Generating the Editors
@Html.DropDownList("<#= property.PropertyName #>", null, htmlAttributes: new { @class = "form-control" })
@Html.DropDownList("<#= property.PropertyName #>", String.Empty) @Html.EditorFor(model => model.<#= property.PropertyName #>) @Html.EnumDropDownListFor(model => model.<#= property.PropertyName #>,
htmlAttributes: new { @class = "form-control" }) @Html.EditorFor(model => model.<#= property.PropertyName #>,
new { htmlAttributes = new { @class = "form-control" } }) @Html.EditorFor(model => model.<#= property.PropertyName #>)
msdnmagazine.com
March 2018 31
