
Page 36 - MSDN Magazine, March 2018
P. 36
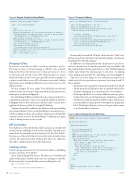
Figure 4 Simple TimeEntryViewModel
Figure 5 Custom Validator
namespace TimeTracking.Common.ViewModels {
public class TimeEntryViewModel {
[Key]
public int Id { get; set; }
[Required (ErrorMessage ="All time entries must always be entered")] [DateRangeValidator (ErrorMessage ="Date is outside of expected range",
MinimalDateOffset =-5, MaximumDateOffset =0)]
public DateTime StartTime { get; set; } [DateRangeValidator(ErrorMessage = "Date is outside of expected range",
MinimalDateOffset = -5, MaximumDateOffset = 0)] public DateTime EndTime { get; set; } [StringLength (128, ErrorMessage =
"Task name should be less than 128 characters")]
[Required (ErrorMessage ="All time entries should be associated with a task")] public string Task { get; set; }
public string Comment { get; set; }
} }
public class DateRangeValidator : ValidationAttribute {
public int MinimalDateOffset { get; set; }
public int MaximumDateOffset { get; set; }
protected override ValidationResult IsValid(object value,
ValidationContext validationContext) {
if (!(value is DateTime))
return new ValidationResult("Inputted value is not a date");
var date = (DateTime)value;
if ((date >= DateTime.Today.AddDays(MinimalDateOffset)) &&
date <= DateTime.Today.AddDays(MaximumDateOffset))
return ValidationResult.Success;
return new ValidationResult(ErrorMessage);
} }
Bringing in Data
In practice, your data would be stored in a database, proba- bly using an object relational mapper (ORM) such as Entity Framework. Here, I’ll sidestep issues of data persistence to focus on the front end. I’ll rely on the Web API controllers to return hardcoded values in the Get actions and I’ll run these samples in a perfect world where every API call returns successful. Adding appropriate error handling will be left as an exercise for you, the intrepid reader.
For this example I’ll use a single View Model decorated with attributes from the System.ComponentModel.DataAnnotations namespace, as shown in Figure 4.
The DateRangeValidator attribute doesn’t come from the Data- Annotations namespace. This isn’t a standard validation attribute, but Figure 5 shows how easily a new validator can be created. Once applied, it behaves just like the standard Validators.
Anytime the model is validated, all validators will run, including any custom validators. Views created with Razor can easily incorpo- rate these validations client-side, and these validators are automatically evaluated on the server by the Model Binder. Validating user input is key to having a more secure system.
API Controllers
Now that I have a View Model, I’m ready to generate a controller. I’ll use the built-in scaffolding to stub out the controller. This will create methods for the standard verb-based actions (Get, Post, Put, Delete). For purposes of this article, I’m not worried about the details for these Actions. I’m only interested in verifying that I have the endpoints that will be called from the client-side framework.
Creating a View
Next, I turn my attention to the View that the built-in scaffolding produces from the View Model.
In the TimeTracking.Web project, I’ll add a new Controller and name it TimeEntryController and create it as an Empty Controller. In this Controller, I create the Edit action by adding this code:
public ActionResult Edit() {
return PartialView(new TimeEntryViewModel()); }
From inside this method, I’ll right-click and select “Add View.” In the popup, I’ll specify that I want an Edit template, selecting the TimeEntryViewModel template.
In addition to specifying the model, I make sure to specify cre- ation of a partial view. I want the generated view to include only the markup defined in the generated view. This HTML fragment will be injected into the existing page on the client. A sampling of the markup generated by the scaffolding is shown in Figure 6.
There are a few key things to note with this generated view, which out of the box generates a responsive, bootstrap-based UI. These include:
• The form group is repeated for each property in the View Model. • The Id property is hidden because it’s marked with the Key
attribute identifying it as a key that’s not to be modified.
• Each input field has associated validation message place- holders that can be used if unobtrusive validation is enabled. • All labels are added using the LabelFor helper, which inter- prets metadata on the property to determine the appropriate label. The DisplayAttribute can be used to give a better name,
as well as handle localization.
Figure 6 Razor Markup for the Edit View
@model TimeTracking.Common.ViewModels.TimeEntryViewModel
@using (Html.BeginForm()) {
@Html.AntiForgeryToken()
<div class="form-horizontal">
<h4>TimeEntryViewModel</h4>
<hr />
@Html.ValidationSummary(true, "", new { @class = "text-danger" }) @Html.HiddenFor(model => model.Id)
<div class="form-group">
@Html.LabelFor(model => model.StartTime, htmlAttributes:
new { @class = "control-label col-md-2" }) <div class="col-md-10">
@Html.EditorFor(model => model.StartTime,
new { htmlAttributes = new { @class = "form-control" } })
@Html.ValidationMessageFor(model => model.StartTime, "", new { @class = "text-danger" })
</div> </div>
... </div>
}
<div>
@Html.ActionLink("Back to List", "Index")
</div>
30 msdn magazine
ASP.NET
