
Page 36 - MSDN Magazine, October 2017
P. 36
In this example, I’ll implement both a foreground handler and a background handler, and demonstrate integrating your static content and REST APIs. Begin by creating a new solution in Visual Studio with the Blank App (Universal Windows) C# project template. Name the solution MyPackagedPlugin and the project MyApp. The app will host the foreground handler. When prompted, target at least the Creator’s Update SDK (15063), to ensure availability of the WDP API. Next, add a runtime component library to the solu- tion, using the Windows Runtime Component Visual C# template. Name this project MyComponent. This library will host the background handler.
To ensure that the component is included in the app package, add a reference to it in the app project. In Solution Explorer, expand the app project node, right- click the References node, and pick Add Reference. In the Reference Manager dialog, expand the Projects node, select Solution and check the MyComponent project.
Before moving on, set the solution platform to match your machine’s architecture. This is a requirement for a packaged plug-in, as WoW64 is not supported. Note that in this case, I’m deploying to the local machine, but the advice also applies when deploying to a secondary target device.
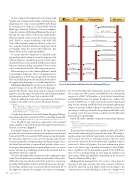
Client
/foo Request
HTTP.sys
Packaged Plug-in WDP Service
Read Manifest Configuration Route = /foo, etc.
Reserve /foo, etc. Create HTTP Request Queue /foo Rrequest
/foo Response
/foo Request
/foo Response
/foo Response /foo Request
/foo Response
Activate Plug-in
Transfer HTTP Request Queue
Hand Off /foo Request
PLM Terminates App
Editing the Manifest Because there are a number of
manifest changes necessary, I’ll edit the Package.appx-
manifest file directly, rather than using the designer. In Solution Explorer, under the app node, right-click on the Package.appxman- ifest file node, and pick View Code to edit the XML.
Begin by adding the uap4 and rescap namespace declarations
and aliases that will be necessary for subsequent elements:
<Package ... xmlns:uap4="http://schemas.microsoft.com/appx/manifest/uap/windows10/4" xmlns:rescap="http://schemas.microsoft.com/appx/manifest/foundation
/windows10/restrictedcapabilities" IgnorableNamespaces="... uap4 rescap">
To make the package more discoverable during debugging, I’ll change the package name from a generated GUID to something meaningful:
<Identity Name="MyPackagedPlugin" Publisher="CN=msdn" Version="1.0.0.0" />
Next, I’ll add the app extensions required for each packaged plug-in handler to the package\applications\application\extensions element, as shown in Figure 4.
Eachhandlerrequirestwoextensions.TheAppServiceextension provides the activation mechanism and communication channel between the WDP service and the WDP runtime hosting the handler. By convention, AppServices uses a reverse domain name scheme to ensure uniqueness. If implementing a background AppService, the EntryPoint attribute is required and specifies where execu- tion begins. If implementing a foreground AppService, execution begins with the app’s OnBackgroundActivated method and the EntryPoint attribute is omitted.
The DevicePortalProvider extension provides configuration data for the DevicePortalConnection that hosts the handler. A DevicePor- talProvider represents the client side of the AppService connection, providing URL handlers to the DevicePortalConnection. The App- ServiceName attribute must correspond with the Name attribute of the AppService element (for example, com.contoso.www.myapp).
The DevicePortalProvider element may specify a ContentRoute for serving static Web content; a HandlerRoute for dispatching requests to a REST API handler; or both. Both ContentRoute and HandlerRoute must be unique. If either route conflicts with a built-in WDP route, or with a previously registered packaged plug-in route, the plug-in will fail to load, presenting an appropriate diagnostic message. Additionally, the ContentRoute relative URL must map to a relative path under the package install folder (such as \myapp\www). For more details, see the DevicePortalProvider Extension Spec (bit.ly/2u1aqG8).
Finally, I’ll add the capabilities required for my packaged plug-in:
<Capabilities>
<Capability Name="privateNetworkClientServer" /> <rescap:Capability Name="devicePortalProvider" />
</Capabilities>
TheprivateNetworkClientServercapabilityenablesHTTP.SYS functionality within an AppContainer. In this demo, I’ll be deploy- ing the package directly from Visual Studio onto the local machine for execution. However, to onboard your app to the store, you’ll also need to obtain the devicePortalProvider capability, which is restricted to Microsoft partners. For more information, please refer to the article, “App Capability Declarations” (bit.ly/2u7gHkt). These capabilities are the minimum required by the WDP run- time to host a packaged plug-in. Your plug-in’s handler code may require additional capabilities, depending on the Universal Windows Platform APIs it calls.
Adding Static Content Next, let’s create a status page for the plug-in. The page, and any other static content it references, should be placed in an app-relative path corresponding to the content route reserved for the plug-in, in this case, /myapp/www.
Figure 3 Activation and Execution of a Packaged Plug-in
32 msdn magazine
Windows Device Portal
