
Page 28 - MSDN Magazine, August 2017
P. 28
Customization of Xamarin.Forms elements leads you to a different view of the solution architecture, with custom renderers residing in the middle platform-specific UI layer, as shown in Figure 6.
Custom renderers are powerful and thorough in their imple- mentation as platform-specific enablers of Xamarin.Forms UI elements. Custom renderers are, however, heavy artillery. If you want something more tactical, like merely customizing a property on a Xamarin.Forms control, consider an “effect.”
Effects
Effects provide access to individual platform-specific properties of controls and can be parameterized. To create an effect, first cre- ate a class that is a subclass of the RoutingEffect class. Mind the method overrides and attributes. Then use the effect in your app.
In addition to exposing properties, effects also have the capac- ity to pass parameters to those properties and define events on Xamarin.Forms controls. You pass parameters to the effect using Attached Properties or the Common Language Runtime (CLR). The following example uses the CLR to bind properties to the effect and creates the DropShadowEffect in the Xamarin.Forms project:
public class DropShadowEffect : RoutingEffect {
public Color Color { get; set; }
public DropShadowEffect () : base ("FAA.DropShadowEffectLabel") {
} }
This label effect provides a color property for the shadow and references the platform-specific implementation of the Drop- ShadowEffectLabel in its base class.
You implement the effect in a platform-specific project, simi- larly to a custom renderer, although implementation is optional in each platform. Once per project, you add a ResolutionGroup- Name attribute containing your company name to avoid collisions with other effects of the same name. Each Effect class is subclassed
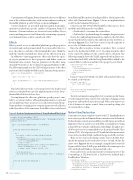
Figure 8 Android Implementation of DropShadowEffectLabel
from PlatformEffect and needs an ExportEffect, which registers the effect with Xamarin.Forms. Figure 7 shows an implementation on iOS in the Xamarin.iOS project.
Control is an iOS UIView.PlatformEffect that exposes these methods and which must be overridden:
• OnAttached—customize the control here
• OnDetached—perform cleanup (for example, deregister events) Next is the Android implementation, similar to the iOS effect, except that the label control is the Android-specific TextView, as shown in Figure 8. The TextView control is typed explicitly to
access the SetShadowLayer method.
Once the effect is in place, it’s time to invoke it. First, a control
needs to be declared in XAML or C#. You then attach the effect to the control by adding it to the control’s effects collection. The following example shows the XAML approach with an Entry con- trol declared in XAML with the DropShadowEffect added to the control’s Effects collection and the Color property set to black:
<Label Text="Label with Shadow" ... > <Label.Effects>
<local:DropShadowEffect Color="Black">
</local:DropShadowEffect> </Label.Effects>
</Label>
Using C# instead of XAML, the label with attached effect can be created, as shown here:
var label = new Label {
Text = "Label with Shadow", ...
};
label.Effects.Add (new DropShadowEffect {
Color = Color.Black, });
Tactical customization using effects lets you make specific chang- es to the Xamarin.Forms controls, but sometimes changing certain properties and methods just isn’t enough. When you want to use a lot of features of a native control, then you wind up doing a lot of custom effects coding.
Native View Declaration
Sometimes you want complete control of the UI. Thankfully there’s now a way to get this in Xamarin.Forms via native view declaration. Declared native controls are incredibly powerful, but are not without limitations. They’re easiest to use in XAML, secondarily in C# using a Shared Project (which is called native embedding), though it’s pos- sible but not easy or recommended to use them in a Portable Class Library (PCL). A lot of projects use PCLs and that often means native views are best used in XAML, and that’s the approach I’ll cover here.
There are two steps in declaring a native view in XAML. First, specify the namespace for each native source. Second, declare the native view. Figure 9 shows an example, using the label control. It begins with the basic XAML page and defines the namespaces for iOS, Android and Windows (shown in bold code).
Next, native views are declared in the Content property of the ContentPage. A UILabel for iOS, a TextView for Android and a TextBlock for Windows:
<ContentPage.Content>
<ios:UILabel Text="This is an iOS UILabel" View.HorizontalOptions="Start"/> <androidWidget:TextView Text="This is an Android TextView"
x:Arguments="{x:Static formsandroid:Forms.Context}" /> <win:TextBlock Text="This is a Windows TextBlock"/>
[assembly:ResolutionGroupName ("FAA")]
[assembly:ExportEffect (typeof(DropShadowEffectLabel), "DropShadowEffectLabel")] namespace b4ufly.Droid
{
public class DropShadowEffectLabel : PlatformEffect {
protected override void OnAttached () {
try {
var control = Control as Android.Widget.TextView; var effect =
(DropShadowEffect)Element.Effects.FirstOrDefault (e => e is DropShadowEffect);
if (effect != null) {
Android.Graphics.Color color = effect.Color.ToAndroid (); control.SetShadowLayer (5, 5, 5, color);
// params: radius, offsetX, offsetY, color
}
} catch (Exception ex) {
Console.WriteLine ("Cannot set effect property. Error: ", ex.Message); }
}
protected override void OnDetached () {
}
} }
24 msdn magazine
Xamarin.Forms
</ContentPage.Content>
