
Page 26 - MSDN Magazine, August 2017
P. 26
foundation of customization options for those times when you really need native features. Use custom renderers to build platform- specific UI classes using Xamarin.iOS, Xamarin.Android and the UWP. Use effects to access platform-specific properties. And when you can’t do without the real thing, declare a native view in your Xamarin.Forms layout.
Custom Renderers—B4UFLY Map
The B4UfLY map page is the only page of more than 25 in the app that requires customization. That ratio of 25:1 generic Xamarin.Forms pages to customized page makes this app a strong case study for Xamarin.Forms.
The map uses your current location and provides immediate surrounding flight restrictions and warnings, as shown in Figure 4. A variation on the map page is Planning Mode, which permits the dropping of a pin to determine the restrictions and flight sta- tuses of hypothetical locations, as shown in Figure 5. Note the icon in the upper left indicating “no-fly” due to a nearby controlled
airspace (the “C” icon).
Xamarin.Forms binds to only a fraction of the features available
in the complete platform-specific UI libraries (iOS Webkit, Android SDK and Windows 10 SDK). Fortunately, Xamarin.Forms exposes the mechanism whereby cross-platform views are converted into platform-specific views. This mechanism is called rendering. By creating your own custom renderers, you get full access to platform- specific features buried deep within each view.
Custom renderers are a bridge between Xamarin.Forms and Xamarin platform-specific libraries, Xamarin.iOS, Xamarin.An- droid and Windows 10 SDK. Think of a custom renderer as a way to access and extend the binding between Xamarin.Forms and the platform-specific elements.
Project requirements call for features not possible with the out- of-the-box Xamarin.Forms.Maps library, including the placement of icons and colored areas around each icon to delimit certain air- spaces on the map. Custom rendering to the rescue! Beginning with MapPage, created by inheriting ContentPage, you can create a foundational class, which you can use to customize its renderer for each platform, letting you code custom graphics separately for iOS and Android:
namespace b4ufly.iOS {
public partial class MapPage : ContentPage {
public static MapPage me = null;
public static MyMap map = null;
public static Boolean plannerModeOn = false;
Once you have a custom element, MapPage, then you need to create the custom renderers for each platform, iOS and Android in B4UFLY, although you can also do this for UWP. Renderers realize a view on the native platform. You create your own ren- derer by inheriting from the standard MapRenderer, beginning with iOS:
[assembly:ExportRenderer (typeof(MyMap), typeof(MyMapRenderer))] namespace b4ufly.iOS
{
public class MyMapRenderer : MapRenderer, MapExtension {
MyMapRenderer draws the locations on the map that drone flyers need to be aware of: airports, controlled airspace, military
iOS App
Android App
Windows 10 App
Cross-Platform UI Layer
Platform-Specific UI Layer
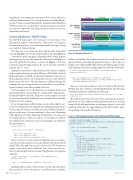
Using Custom Renderers
Core Library
Business Logic and Data Layer
22 msdn magazine
Xamarin.Forms
Figure 6 Xamarin.Forms UI
Shared C# Code and Markup Using Xamarin.Forms
C# Code Using Xamarin.iOS
C# Code Using Xamarin.Android
facilities and the like. The renderer draws both icons and surround- ing colored areas denoting the important airspace. These types of graphics are handled slightly differently in iOS than in Android. The Android map renderer uses a similar approach to the one used for iOS:
[assembly: ExportRenderer (typeof(MyMap), typeof(MyMapRenderer))] namespace b4ufly.Droid
{
public class MyMapRenderer : MapRenderer, MapExtension, GoogleMap.IOnCameraChangeListener, GoogleMap.IOnMarkerDragListener, GoogleMap.IOnMarkerClickListener
{
Once you create the renderers, it’s time to use them. Based on the MyMap data type, which uses the MyMapRenderer, the following statement instantiates a platform-specific map:
map = new MyMap(MapSpan.FromCenterAndRadius(new Position(0, 0), Distance. FromMiles(1.0)))
The built-in Inversion of Control (IoC) mechanism in Xama- rin.Forms uses the renderer from the platform project currently being built. By adding platform-specific map references, you could explicitly instantiate an Apple Mapkit in the iOS renderer and a Google Map in the Android renderer.
Figure 7 iOS implementation of DropShadowEffectLabel
C# Code Using Windows 10 SDK
Shared C# Code
[assembly:ResolutionGroupName ("FAA")]
[assembly:ExportEffect (typeof(DropShadowEffectLabel), "DropShadowEffectLabel")] namespace b4ufly.iOS
{
public class DropShadowEffectLabel : PlatformEffect {
protected override void OnAttached () {
try {
var effect =
(DropShadowEffect)Element.Effects.FirstOrDefault (e => e is DropShadowEffect);
if (effect != null) {
Control.Layer.ShadowColor = effect.Color.ToCGColor(); Control.Layer.CornerRadius = 5; Control.Layer.ShadowOffset = new CGSize (5, 5); Control.Layer.ShadowOpacity = 1.0f; }
} catch (Exception ex) {
Console.WriteLine ("Cannot set effect property. Error: ", ex.Message); }
}
protected override void OnDetached () {
}
}
