
Page 83 - MSDN Magazine, May 2017
P. 83
Close the app and return to the code in the MainPage.xaml file in Visual Studio. Add the following XAML into the StackPanel control after the btn3DView button:
<Button Name="btnRotateCameraLeft" Content="Rotate Left" Click="btnRotateCameraLeft_Click" />
<Button Name="btnRotateCameraRight" Content="Rotate Right" Click="btnRotateCameraRight_Click" />
<Button Name="btnTiltCameraDown" Content="Tilt Down" Click="btnTiltCameraDown_Click" />
<Button Name="btnTiltCameraUp" Content="Tilt Up" Click="btnTiltCameraUp_Click" />
This XAML will create four buttons to control the viewport of the map. Two are for controlling heading: one to turn right and the other to turn left. Two are for controlling the pitch: one to tilt up and the other to tilt down. Now, add the event handlers, as shown in Figure 7, to the MainPage.xaml.cs file.
The methods TryRotateAsync and TryTiltAsync both take a parameter of type double that represents the angle to rotate or tilt, respectively. Negative values rotate left and tilt down. Positive values rotate right and tilt up. Run the app now. Click on 3D View and try out the control you now have over the map through the buttons. Your app should look something like Figure 8.
StreetSide View
One of the other powerful features of Bing Maps is the Street- Side View, which lets users explore a location through a series of
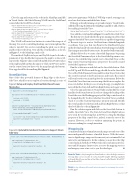
Figure 9 Setup and Display the StreetSide View of Lower Manhattan
interactive panoramas. With the UWP Map control, your apps can now have this feature embedded into them.
If the app is already running, stop it and return to Visual Studio. Add the following XAML in the MainPage.xaml file to add a button for enabling StreetSide View:
<Button Name="btnStreetSide" Content="StreetSide" Click="btnStreetSide_Click" />
Now add the event handler in Figure 9 to enable StreetSide View.
The first step is to check whether the app is running on a device that supports StreetSide View, as not every device is capable of supporting it. The next step is to create a GeoPoint from a latitiude/longitude coordinate. Now, pass that GeoPoint to the FindNearbyAsync method to find a nearby location that has StreetSide imagery available. If no imagery near that location exists, the method will return null.
All that’s left to do is to create a StreetSide Experience by passing the StreetSide Panorama object to the StreetSide Experience con- structor. To switch the Map control over to StreetSide View, set the Map control Custom Experience property to the newly created StreetSide Experience object.
Run the solution now and click on the StreetSide button. Click on Tilt Up and Tilt Down and the app should show the StreetSide View of the World Financial Center and Freedom Tower. Notice that the control responds to keyboard, mouse and touch. The control will even let you zoom in and explore the environment. Below the StreetSide View, there’s an overview map that lets users explore the area even further. In the process of using the app, you might have noticed that the Turn Left and Turn Right buttons no longer work.
Close the app and return to Visual Studio and modify the event handlers for the turn buttons. In order to change the heading of the StreetSide view, the Heading property of the Map control needs to be changed directly. To detect whether StreetSide View is enabled, check to see if the Custom Experience property isn’t null. Modify the event handlers for the Turn Left and Turn Right buttons so that they look like the code in Figure 10.
Run the solution again and click on the StreetSide button to enable StreetSide View. The Turn Left and Turn Right buttons now work. It’s worth noting that, in 3D View, setting the Heading property of the Map control does, indeed, rotate the view of the camera. However, it does so without animating the points in between, making for a rough transition.
Wrapping Up
As mentioned in my column last month, maps are truly one of the more indispensable features of mobile devices. With the transi- tion to digital maps, maps can become not just customizable, but interactive and immersive. In this column, you saw how the Map control included with the UWP provides these rich interactive fea- tures and 3D imagery. In most cases, access to the mapping services and imagery come at no cost to you, the developer. n
Frank La Vigne is chief evangelist at DataLeader.io, where he helps customers leverage data science in order to seek actionable insights. He blogs regularly at FranksWorld.com and has a YouTube channel called Frank’s World TV (FranksWorld.TV).
Thanks to the following Microsoft technical expert for reviewing this article: Rachel Appel
if (mapControl.IsStreetSideSupported) {
BasicGeoposition nycDowntownLatLong = new BasicGeoposition() {
Latitude = 40.712929,
Longitude = -74.018291 };
Geopoint nycDowntownPoint = new Geopoint(nycDowntownLatLong); StreetSidePanorama panoramaNearDowntownNYC =
await StreetSidePanorama.FindNearbyAsync(nycDowntownPoint);
if (panoramaNearDowntownNYC != null) {
var nycSSE = new StreetSideExperience(panoramaNearDowntownNYC);
mapControl.CustomExperience = nycSSE; }
} }
Figure 10 Updated Rotate Event Handlers to Support Street- Side View
private async void btnRotateCameraLeft_Click(object sender, RoutedEventArgs e) {
await mapControl.TryRotateAsync(-30); if (mapControl.CustomExperience != null) {
mapControl.Heading = mapControl.Heading - 30; }
}
private async void btnRotateCameraRight_Click(object sender, RoutedEventArgs e) {
await mapControl.TryRotateAsync(30);
if (mapControl.CustomExperience != null) {
mapControl.Heading = mapControl.Heading + 30;
} }
msdnmagazine.com
May 2017 77
