
Page 82 - MSDN Magazine, May 2017
P. 82
MapCamera Location
Figure 7 Event Handlers for UI Buttons that Control the Map- Scene Camera
private async void btnRotateCameraLeft_Click(object sender, RoutedEventArgs e) {
await mapControl.TryRotateAsync(-30); }
private async void btnRotateCameraRight_Click(object sender, RoutedEventArgs e) {
await mapControl.TryRotateAsync(30); }
private async void btnTiltCameraUp_Click(object sender, RoutedEventArgs e) {
await mapControl.TryTiltAsync(15); }
private async void btnTiltCameraDown_Click(object sender, RoutedEventArgs e) {
await mapControl.TryTiltAsync(-15); }
Map
For URIs of Web sites, this will launch the default browser on the system and load the URI sent to it. The Launcher class resides in the Windows.System namespace. You have the option of adding the namespace manually with a using statement or letting Visual Studio handle that detail. The Launcher class can do much more than simply open a browser. You can read more about the Launcher class at bit.ly/2n4Zx0F.
Run the solution now and it should look like Figure 1. Clicking on any of the markers will bring up a Web site about the landmark.
Maps in Three Dimensions
One of the more appealing aspects of the Bing Maps UWP con- trol is its ability to render 3D images of many locations around the world. To get started, create a new project using the steps detailed in the Getting Started section. This time, however, name the solution 3DMaps. Be sure to add the namespace declaration to the Main- Page.xaml file to include the maps namespace. Insert the XAML shown in Figure 4 in the Page node of MainPage.xaml to the Map control and a series of buttons to control the 3D view of the map.
Manipulating 3D Maps
Viewing a map in 3D is simple and I touched on that briefly in my column last month. However, all the sample app from that column did was switch to 3D view. Now, let’s go over how to program- matically manipulate a 3D map. Add
MapScene Location
Figure 6 Conceptual Diagram of a MapScene
the event handler for the btn3Dview button, as shown in Figure 5.
Immediately, you’ll notice the code to switch the Map control Style prop- erty to Aerial3DWithRoads. Beyond that, I want to be able to control spe- cific details about the view. In this example, I want to show the skyline of Lower Manhattan. In order to do this, I need to “frame a shot” very much in the same way a photographer would by picking a location in 3D space to set up a camera and point in a certain position and specified angle. The dia- gram in Figure 6 provides an overview.
To set up the desired picture, start with a latitude and a longitude to define the location. Then define variables for radius, heading and pitch to control the view of the camera. Next, create a
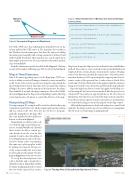
Figure 8 The App After Clicking Rotate Right Several Times
76 msdn magazine
Modern Apps
MapScene using the MapScene.CreateFromLocationAndRadius method. This creates a scene centered on the specified latitude and longitude from a certain distance away in meters (radius). Heading refers to the direction in which the camera faces. This value can be anywhere from zero to 360, representing the compass points. For ref- erence, a value of 90 represents East. A value of zero is North, 180 is South, and 270 is West. Pitch refers to the angle at which the camera is facing. Zero would be a top-down view and 90 would be perpendicular.
Once the MapScene object is created, it’s applied to the Map con- trol by using the TrySetSceneAsync method. Run the project now. Click on 3D View and your app should show a 3D view of lower Manhattan. Note that you can control the map via mouse and key- board. If your device supports touch, you may also use touch gestures to control the heading, zoom level and pitch of the Map control.
Although having the mouse, keyboard and gesture control built right into the Map control is good, it would be nice to manipulate the 3D viewport of the map programmatically.
