
Page 39 - MSDN Magazine, June 2019
P. 39
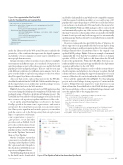
Figure 5 An .appinstaller File That Will Look for Updated Files on \\server\foo
and double-click installed on any Windows 10-compatible computer with the required certificate installed, or you could set up a CD pipeline that copies the package to a Web site or a file share where your end users can download it. I’ll come back to this in just a bit.
Auto-updates While an MSIX package is able to extract itself and automatically replace any older version of the packaged app that may be present on the machine when you install it, the MSIX format doesn’t provide any built-in support for automatically updating an app that has already been installed from an .msix file when you open it.
However, starting with the April 2018 Update of Windows 10, there’s support for an app installer file that you can deploy along with your package to enable automatic updates. It contains a Main- Package element whose Uri attribute refers to the original or an updated MSIX package. Figure 5 shows an example of a minimal .appinstaller file. Note that the Uri attribute of the root element specifies a URL or a UNC path to a file share where the OS will look for the updated files. When the URI differs between a cur- rently installed version and a new app installer file, the deployment operation will redirect to the “old” URI.
The UpdateSettings element is used to tell the system when to check for updates and whether to force the user to update. The full schema reference, including the supported namespaces for each version of Windows 10, can be found in the docs at bit.ly/2TGWnCR.
If you add the .appinstaller file in Figure 5 to the packaging project and set its Package Action property to Content and the Copy to Output Directory property to Copy if newer, you can then add another PowerShell task to the YAML file that updates the Version attributes of the root and MainPackage elements and
saves the updated file to the staging directory:
- powershell: | [Reflection.Assembly]::LoadWithPartialName("System.Xml.Linq") $doc = [System.Xml.Linq.XDocument]::Load(
"$(Build.SourcesDirectory)/Msix/Package.appinstaller") $version = "$(major).$(minor).$(build).$(revision)" $doc.Root.Attribute("Version").Value = $version;
$xName =
[System.Xml.Linq.XName] "{http://schemas.microsoft.com/appx/appinstaller/2018}MainPackage"
$doc.Root.Element($xName).Attribute("Version").Value = $version;
$doc.Save("$(Build.ArtifactStagingDirectory)/MsixDesktopApp.appinstaller") displayName: 'Version App Installer File'
<?xml version="1.0" encoding="utf-8"?>
<AppInstaller xmlns="http://schemas.microsoft.com/appx/appinstaller/2018"
Version="1.0.0.0"
Uri="\\server\foo\MsixDesktopApp.appinstaller"> <MainPackage Name="MyCompany.MySampleApp"
Publisher="CN=MyCompany, O=MyCompany, L=Stockholm, S=N/A, C=Sweden" Version="1.0.0.0"
Uri="\\server\foo\MsixDesktopApp.msix" ProcessorArchitecture="x86"/>
<UpdateSettings>
<OnLaunch HoursBetweenUpdateChecks="0" />
</UpdateSettings> </AppInstaller>
under the Library tab in the Web portal. Because it includes the private key of the certificate that represents the digital signature and identity of your company, you don’t want to distribute it to more people than necessary.
In large enterprises where you release your software to multiple environments in different stages, it’s considered a best practice to sign the packages as part of the release process and let the build pipeline produce unsigned packages. This not only lets you sign with different certificates for different environments, but it also gives you the ability to upload your packages to the Store where they’ll be signed by a Microsoft certificate.
Also note that secrets, such as the password for the PFX file, shouldn’t be included in the YAML file. Unlike variables that spec- ify the targeted processor architecture and the package version, they’re defined and set in the Web interface.
Figure 3 shows the solution explorer for a WPF application that was created using the default project template in Visual Studio and packaged using a Windows Application Packaging project. The YAML file has been added to the packaging project and is checked in to a source code repository together with the rest of the code.
To set up the actual build pipeline, you browse to the Azure DevOps portal at dev.azure.com/<organization> and create a new project. If you don’t have an account, you can create one for free. Once you’ve signed in and created a project, you can either push the source code to the Git repository that’s set up for you at https://<organization>@dev.azure. com/<organization>/<project>/
_git/<project>, or use any other provider, such as GitHub. You’ll get to choose the location of your repository when you create a new pipeline in the portal by clicking first on the “Pipelines” button and then on “New Pipeline.”
On the Configure screen that comes next, you should select the “Existing Azure Pipelines YAML file” option and select the path to the checked-in YAML file in your repository, as Figure 4 shows.
The MSIX package that’s produced by the build can be downloaded msdnmagazine.com
Figure 6 The Pipeline Tab in the Azure DevOps Portal
June 2019 35
