
Page 36 - MSDN Magazine, November 2018
P. 36
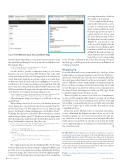
Figure 8 The Web Site Input Form and Result Page
Entity Framework package to your Azure Function project, using the same Package Manager Console you used to install the Service Bus package, like so:
Install-Package Microsoft.EntityFrameworkCore.SqlServer -Project OvaryVisFnApp –version 2.1.2
You also need to provide a connection string so your Azure Function can access your Azure SQL Database. This is the same connection string used by your Web app and it’s best set from your Azure Function’s Applications Settings, which is accessible from its Overview blade in the Portal shown in Figure 4. You need to scroll down to the Connection Strings section and then click Add new connection string with the name DefaultConnection, type SQLAzure and the following value, though with the name of your own database server and its username and password:
Server=tcp:msdnovaryvisdbsvr.database.windows.net,1433;Database=Msdn.OvaryVisDb; User ID=XXX;Password=YYY;Encrypt=true;Connection Timeout=30;
After adding the string, don’t forget to scroll back to the top and click Save.
The last thing you need to do to access your database from your Azure Function is copy the DataContext class and the OvaryVis model class from your Web app project to your Function app project. You’ll need to change the namespace of both files to Ovary- VisFnApp, but otherwise you should be able to rebuild your solution without any problems (press F7). Finally, you need to implement the following method and then call it from the Run method of the OvaryVisSubmitProc function. Here’s the code:
private static async Task<string> FormSubmittedProc(IConfigurationRoot config, ApplicationDbContext dbContext, string queueItem)
{
string rc = "FormSubmittedProc: ";
var record = await dbContext.OvaryVis.SingleOrDefaultAsync(a => a.Id ==
queueItem);
if (record == null)
rc += string.Format("record not found: Id={0}", msg.Id); else
rc += string.Format("record Id={0} found, ", record.Id); return rc;
}
The config parameter passed to FormSubmittedProc by the Azure Function Run method is obtained using ConfigurationBuilder and provides access to its application settings, including the database connection string. This is then used to create the ApplicationDb- Context object that forms the second parameter. You can find the
exact implementation details in the sample code download.
You’ve completed the develop- ment work for this article, so now it’s time to rebuild your Visual Studio Solution, publish its Azure Function app project and give it a quick smoke test. If you open the Azure Function App Service Test Blade that I described earlier (Figure 5), you should see the ovary record Id displayed in the log whenever you submit an input form from your Web site, as shown in Figure 8. This indicates that your Azure Function has successfully found the record corresponding
to the Id value contained in the Service Bus message sent from the Web app, so all the parts of the system shown in Figure 1 are working as intended.
Wrapping Up
It’s worth reflecting how easy Azure makes it to develop a robust background processing mechanism for any Web site. With a pro- duction site, you’d want to provide some way to automatically update the results page, rather than rely on the user pressing F4—but this isn’t too difficult to achieve using SignalR or a similar mechanism. However, the provisioning of an Azure Function App Service and Service Bus queue was achieved with just a few commands from the Azure Portal, and integration with your Web app’s Home Controller required only a few lines of code.
There’s very little associated cost for this sort of implementa- tion beyond the small monthly charge for an App Service Plan and database server. If you’re running on the free tier of the App Service Plan, you should be able to host a test Web site for less than the cost of a couple cups of coffee a month. This makes it a truly compelling solution.
In the next article, I’ll explore how to extend an Azure Func- tion by submitting the dimension values in the record to the classifier running on a server provisioned from a Docker im- age. You’ll also see how to start this server automatically when traffic arrives at your Web site, and then stop it after the traffic ceases, implementing an on-demand server that’s billed only for the actual time used. n
Dr. Will Stott has more than 25 years of experience working as a contractor/ consultant for a wide range of companies in the United Kingdom and Europe, including IBM, Cap-Gemini, Logica CMG and Accenture. However, for the last 10 years most of his time has been spent doing research at University College London (UCL) on Ovarian Cancer Screening. Dr. Stott has spoken at many conferences both in the United Kingdom and internationally. He’s also the author of papers published in various jour- nals, as well as the book “Visual Studio Team System: Better Software Development for Agile Teams” (Addison-Wesley Professional, 2007).
thankS to the following Microsoft technical expert for reviewing this article: David Barkol
30 msdn magazine
Azure Service Bus
