
Page 12 - MSDN Magazine, September 2018
P. 12
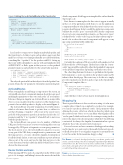
Figure 1 Asking for an ActivatedRoute in the Constructor
detail components. Both happen in template files, rather than the TypeScript code.
First, the most common place for the router to appear is usually in the root of the application itself; that is to say, the application component will most often define where the router’s various com- ponents should appear. In fact, usually the application component will have the router’s “space” surrounded by a header component above it, a footer component below it and so on. The router’s “space” is defined by the “router-outlet” tag, and it’s almost always empty— inside of it is where the routed components will appear, so my app.component.html will look like this:
div style="text-align:center"> <h1>
Welcome to {{ title }}! </h1>
</div>
<h2>Welcome to our conference</h2> <router-outlet></router-outlet>
<h6>No speakers are actually going to appear, so...</h6>
Certainly, the conference Web site could do with a makeover, but I’ll leave that for a Web designer. The key here is that the “router- outlet” tag pair will be replaced by either the SpeakerlistComponent or the SpeakerComponent, depending on which route is used.
The other thing that must be done is to put links in the Speaker- listComponent, so users can click on the speaker’s name and be taken to their details page. The easiest way to do this is to simply provide standard-issue hrefs in anchor tags in the Speakerlist- Component’s template, like so:
<div>
<div *ngFor="let speaker of speakers">
<a href="/speaker/{{speaker.id}}"> {{speaker.firstName}} {{speaker.lastName}}</a>
</div> </div>
And with that, we have a basic master-detail application.
Wrapping Up
There’s a great deal more to discover about routing—it’s a far more complex subject than I can completely cover here. For example, you can also specify an arbitrary (static) “data” parameter when defining the routes collection, which can then be picked up in the activated route object, or you can define what Angular calls a “resolve guard,” which can be used to do certain processing (such as retrieve the data for the selected speaker) while the UI is still being constructed. As always, the Angular documentation has copious details for those who are interested to learn more.
For now, however, we have our master-detail approach working, and it’s time for us to part ways for the month. In the next episode, we’ll talk about how to use Angular’s support for automated tests to test this sucker. In the meantime, happy coding! n
Ted Neward is a Seattle-based polytechnology consultant, speaker, and mentor, currently working as the director of Engineering and Developer Relations at Smartsheet.com. He’s written a ton of articles, authored and co-authored a dozen books, and speaks all over the world. Reach him at ted@tedneward.com or read his blog at blogs.tedneward.com.
ThaNks to the following technical expert: Garvice Eakins (Smartsheet.com)
@Component({
selector: 'app-speaker',
templateUrl: './speaker.component.html', styleUrls: ['./speaker.component.css']
})
export class SpeakerComponent implements OnInit {
@Input() speaker : Speaker
constructor(private speakerService: SpeakerService, private route: ActivatedRoute) {
}
ngOnInit() {
const speakerId = this.route.snapshot.params['id']; this.speaker = this.speakerService.getSpeakerById(speakerId);
} }
Last, I need to set up a route to display an individual speaker, and the typical way to do that is to give each speaker a page/route that makes use of some sort of unique identifier associated with them, something like “/speaker/1” for the speaker with ID 1. Setting up that route will look familiar to anyone with any familiarity with ASP.NET MVC or Rails, again, in that you use a colon-prefixed parameter name as a placeholder for the actual value passed in:
const appRoutes: Routes = [
{ path: 'speaker/:id', component: SpeakerComponent },
{ path: 'speakers', component: SpeakerlistComponent },
{ path: '', redirectTo: '/speakers', pathMatch: 'full' }, { path: '**', component: PageNotFoundComponent }
];
The only real question left on that subject is how the SpeakerCom- ponent obtains the “id” parameter; therein lies an interesting tale.
ActivatedRoutes
When routing kicks in and brings a component to the screen, an ActivatedRoute object contains information about the route used, including the parameters to the route (such as the “:id” used earlier). Like most things in Angular, an ActivatedRoute is an injectable object, so you can ask for it in the constructor of the SpeakerCom- ponent to know which speaker to display, as shown in Figure 1.
The ActivatedRoute is heavily wrapped in observable entities, which is a bit more than I want to get into here, so suffice it to say that obtaining a “snapshot” of the route is the easiest way to get hold of the parameters passed in; from there I ask for the “id” parameter, and the “1” in “/speaker/1” is handed back to me for use with the SpeakerService.
The ActivatedRoute can operate via of a number of different URL parts, by the way, in case you were wondering if the route can be mapped by URL parts or fragments or even query parameters. The short answer is yes, the ActivatedRoute can give you access to any part of the URL that you might want to parameterize, and the long answer is, of course, check the Angular documentation for all the details. In fact, routes can actually incorporate arbitrary data as part of the route, and resolve that data just prior to the route’s activation, but that’s a little far afield of what I have room to discuss this time around.
Router Outlets and Links
What’s missing still? Two parts: choosing where in the UI the router gets to do its magic, and linking between the master list and the
8 msdn magazine
The Working Programmer
