
Page 11 - MSDN Magazine, June 2018
P. 11
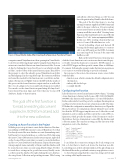
Figure 1 Visual Studio Code After Creating the New Azure Functions Project
and call my collection Ninjas, as well. You can leave the partition key blank for this little demo. The goal of the first function is to read an existing document supplied in JSON format and add it to the new collection. If you’ve read my recent Azure Functions articles in this column, you may recall that one is called “Creating Azure Functions That Can Read from Cosmos DB with Almost No Code” (msdn.com/magazine/mt829268). In this case, I’ll be creating a function that can
write to Cosmos DB with almost no code.
I won’t be building a front end. Instead, I’ll be using the Postman application to construct calls to my APIs and pass the JSON document in as a message body. You can do the same with
Fiddler, as well.
Back on the Azure Functions extension pane,
computer, named NinjaFunctions, then opening it in Visual Studio Code. If you’re following along, begin by using the Azure Functions extension to turn the folder into an Azure Functions folder. You can do this by clicking the Create New Project icon (which looks like a folder), on the toolbar of the Azure Functions pane. Then follow the prompts to select the already opened NinjaFunctions folder and the language. I’m choosing JavaScript. The extension will then add some files needed for the functions into your folder, and ini- tialize a Git repository. Figure 1 shows the IDE with the results of this process in the Azure Functions output window, as well as the files (.vscode, .gitignore, host.json and local.settings.json) it added. You can also see the Azure Functions pane listing all of my cloud- based Azure Function Apps and, below that, my Cosmos DB databases, thanks to that extension.
The goal of the first function is to read an existing document supplied in JSON format and add it to the new collection.
Creating an Azure Function in the Project
With the project set up, it’s time to create the first function. This func- tion will import JSON files into my Cosmos DB database. Note that I’ve already created the new database account (lermandatapoints) but I haven’t yet created a database or a collection. I’ll do that using the Azure Cosmos DB extension. In the extension pane, right-click on the Cosmos DB account where you want to create the database and choose Create Database from the menu. Type in the new name when prompted (mine, naturally, is Ninjas) and this database will be created in your Azure account using default settings. Feel free to tweak those settings in the portal if necessary. Finally, create a collection in the database by right-clicking the new database, choosing Create Collection and providing its name. I’ll be boring msdnmagazine.com
click the Create Function icon to create a new function in the proj- ect folder. I want this function to respond to HTTP requests, so select HTTP trigger and then provide a name. Mine is AddNinja- Document. Following the prompts, make the function anonymous so it’s easier to test without having to provide credentials.
In response to this action, the extension creates a new folder with three files:
• function.json, which contains the default configuration for the function
• index.js file for the logic • a sample data file
Configuring the Function
Like the function created in my January 2018 column, “Creating Azure Functions to Interact with Cosmos DB” (msdn.com/magazine/ mt814991), this function will output data to a Cosmos DB database. In the earlier article, I used the portal to configure this integration and the portal wrote my choices into a function.json file. This time, I’ll define the configuration manually in function.json. Open the file and you’ll see two integrations already defined, based on the fact that the HTTP trigger template was used. After the second integration, add a comma and then copy in this cosmosDB con- figuration, which specifies the name of the document to send to the database, the type of integration (cosmosDB), the database and collection names, the connection setting, and the direction of the integration (out to the database):
{
"name": "outputDocument",
"type": "cosmosDB",
"databaseName": "Ninjas",
"collectionName": "Ninjas", "createIfNotExists": true, "connectionStringSetting": "mydbconnection", "direction": "out"
}
I can define the connection string in the local.settings.json file so I don’t have to hard code it into the function.json file. Local.settings.json is the local representation of the app.settings.json file that will live in the portal and contain your application secrets.
So, here, I’m just saying that the connection string can be found in a setting called mydbconnection.
June 2018 7
