
Page 15 - MSDN Magazine, May 2018
P. 15
Because this feature is largely driven by Win32 parity, it’s initially supported only on Desktop and IoT. Two levels of support for multi-instancing were introduced:
• Multi-Instance UWP App: This is for the simple case, where the app just wants to declare that it should be multi-instanced.
• Multi-Instance Redirection UWP App: This is for the complex case, where the app wants to be multi-instanced, but it also wants to have a say in exactly how each instance is activated.
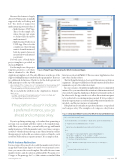
For both cases, a Visual Studio project template is provided, as shown in Figure 1.
For the simple case, the project
template generates code that’s
almost identical to the Blank
Application template code. The only difference is in the use of the SupportsMultipleInstances attribute in the app manifest. There are two additional declarations: The first is for the desktop4 and iot2 XML namespaces at the top of the manifest:
xmlns:desktop4="http://schemas.microsoft.com/appx/manifest/desktop/windows10/4" xmlns:iot2="http://schemas.microsoft.com/appx/manifest/iot/windows10/2"
IgnorableNamespaces="uap mp desktop4 iot2">
The second adds the attribute on the <Application> element:
<Application
Id="App8" Executable="$targetnametoken$.exe" EntryPoint="App8.App" desktop4:SupportsMultipleInstances="true" iot2:SupportsMultipleInstances="true">
If the platform doesn’t indicate a preferred instance, you go ahead and compose a key.
If you’re updating existing app code rather than generating a new app, you can simply add these entries to the manifest man- ually. Once you’ve done this, you can build your app and launch multiple instances. With this manifest entry, every time your app is activated—whether from a tile-tap, or any other activation contract the app supports, such as file-association or protocol-launch—each activation will result in a separate instance. It’s as simple as that.
Multi-Instance Redirection
For most apps, all you need to do is add the manifest entry, but for an app that wants a finer degree of control over its instance activa- tions, you can use the second template. This adds the exact same manifest entries, and also adds an additional file (Program.cs for C# apps, or Program.cpp for C++) that contains a standard Main msdnmagazine.com
Figure 1 New Project Templates for Multi-Instanced Apps
function, as shown in Figure 2. This uses a new AppInstance class introduced in this release.
The first thing the function does is grab this instance’s activation arguments. The app would likely use the information held in these arguments as part of its redirection logic.
In some scenarios, the platform might indicate a recommended instance. If so, you can redirect this activation to that instance instead, if you wish, by using the AppInstance.RedirectActivationTo method. In other words, the app can choose to allow this activation request to be redirected to an existing instance instead. If it does redirect, then the target instance is activated and its OnActivated method is invoked—and this new instance is terminated.
If the platform doesn’t indicate a preferred instance, you go ahead and compose a key. The example code composes a key from a
Figure 2 Standard Main Function for Multi-Instance Redirection
static void Main(string[] args) {
IActivatedEventArgs activatedArgs = AppInstance.GetActivatedEventArgs();
if (AppInstance.RecommendedInstance != null) {
AppInstance.RecommendedInstance.RedirectActivationTo(); }
else {
uint number = CryptographicBuffer.GenerateRandomNumber(); string key = (number % 2 == 0) ? "even" : "odd";
var instance = AppInstance.FindOrRegisterInstanceForKey(key); if (instance.IsCurrentInstance)
{
global::Windows.UI.Xaml.Application.Start((p) => new App());
} else {
instance.RedirectActivationTo(); }
} }
May 2018 11
