
Page 18 - MSDN Magazine, November 2017
P. 18
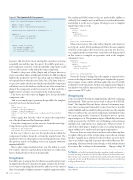
Figure 2 The SpeakerEdit Component
The traditional DOM events to this are methods like onBlur or onKeyUp. For example, say it would be nice to track each keystroke and display it as the user is typing. Developers new to Angular might expect this to work:
@Component({
selector: 'loop-back', template: `
<input #box>
<p>{{box.value}}</p> `
})
export class LoopbackComponent { }
When run, however, this code will not display each character as it’s typed—in fact, it’ll do nothing at all. This is because Angular won’t fire events unless the browser fires an event. For that rea- son, Angular needs an event to fire, even if the code that gets fired in that event is a complete no-operation, such as the template statement 0, as in:
@Component({
selector: 'loop-back', template: `
<input #box (keyup)="0">
<p>{{box.value}}</p> `
})
export class LoopbackComponent { }
Notice the “keyup” binding. This tells Angular to register for key events on the Input element, and that gives Angular the opportu- nity to trigger events, which will then update the view. It’s a little awkward to work with at first, but this way Angular isn’t polling for any kind of event all the time and, thus, doesn’t have to consume quite so many CPU cycles.
Wrapping Up
Some veteran Web developers might find this all a little confusing and awkward: “Why can’t we just go back to the good-ol’ HTML form?” The Angular Way isn’t always obvious, but in many ways, once the reasoning and rationale become clear, they’re usually understandable and reasonable. In this particular case, the Angular Way is to embrace the concept of components and think in terms of constructing usable “constructs” that know how to capture input and process it. This permits a degree of flexibility that wasn’t really present in the “old Web” way of thinking, such as having multiple such components on a single page. (When you have to refresh the whole page to display results, you end up having one input-validate-save-render cycle per input requirement.)
However, there are some other issues here, such as knowing how to update other parts of the system when a user edits an existing Speaker. Angular has a solution for this, but there are a few more steps to go before being able to get into the world of Reactive Pro- gramming. The home stretch is near, though, so stick with me for just a few more. But, as always, in the meantime ... Happy coding! n
Ted Neward is a Seattle-based polytechnology consultant, speaker and mentor, c urrently working as the director of Developer Relations at Smartsheet.com. He’s written a ton of articles, authored and coauthored a dozen books, and works all over the world. Reach him at ted@tedneward.com or read his blog at blogs.tedneward.com.
ThaNks to the following Microsoft technical expert for reviewing this article: James Bender
export class SpeakerEditComponent implements OnInit {
@Input() speaker: Speaker;
@Output() onSave = new EventEmitter<Speaker>();
constructor(private speakerService: SpeakerService) { }
ngOnInit() {
if (this.speaker === undefined) {
this.speaker = new Speaker(); }
}
save(fn: string, ln: string) { this.speaker.firstName = fn; this.speaker.lastName = ln; this.onSave.emit(this.speaker);
} }
begun to talk about the insert and update operations as being essentially one and the same: the upsert. It would be quite nice— and component-oriented—if the SpeakerEdit component could serve as either create or edit within the same component.
Thanks to the power of the @Input and @Output directives you’ve seen earlier, this is actually quite trivial to do. Add an @Input field for the speaker for one to be passed in, and an @Output field to let people know when the user clicks Save. (The latter isn’t nec- essary, if you make the decision that the SpeakerEdit component will always save to the database, and there’s no other action that a client of the component would ever want to do. That would be a highly context-sensitive conversation in the team meeting.)
This leaves me with what’s in Figure 2 for the SpeakerEdit component code.
And, as you might expect given my design skills, the template is pretty bare-bones but functional:
<div>
Speaker Details: <br>
FirstName: <input #firstName><br>
LastName: <input #lastName><br>
<button (click)="save(firstName.value, lastName.value)">Save</button> </div>
Notice, again, that I use the “.value” to extract the string values out of the firstName and lastName input fields.
Using this component (in this exercise, from the main App- Component) is pretty straightforward:
<h3>Create a new Speaker</h3>
<app-speaker-edit (onSave)="speakerSvc.save($event)"></app-speaker-edit>
In this case, I chose to not save the Speaker from within the component, but have clients do so from the emitted event. The speakerSvc object is a dependency-injected SpeakerService, from the previous article on building services in Angular (msdn.com/ magazine/mt826349).
This is what componentization buys you: The ability to create UI “controls” that you can then drop in and just use, rather than have to think about how they work internally.
Firing Events
It would be nice to wrap up here, but there’s one gotcha about events in Angular that deserves attention. It’s quite common for develop- ers to want to trap things like keystrokes and react to the entered data—for example, to display some auto-complete suggestion values.
14 msdn magazine
The Working Programmer
