
Page 27 - MSDN Magazine, September 2017
P. 27
With the CLI you can use your favorite editor to create apps with no need to install heavier-weight tools. To get started, install the free .NET Core SDK (available from dot.net).
Once the SDK is installed, open your favorite command prompt and run “dotnet --help” to see a list of all the commands available to you. The dotnet command is the driver for the .NET CLI, where the grammar is “dotnet <verb> [parameters]”. For example, to see all the project type templates available to create, type “dotnet new.” To create a new project, provide the short name as the parameter to the “new” action; for example, “dotnet new razor” will create a C# ASP.NET Core Web App with the new .NET Core 2.0 Razor Pages (to learn about this great new feature, see aka.ms/razorpages). To run the application, type “dotnet run” and it will build and start the application. Opening a browser to the URL indicated in the output string (for example, http://localhost:5000) lets you interact with the app you’re building. From this point, development is a simple matter of choosing your favorite editor to build and run the app.
Unit Testing
Once you have an app, you’ll want to add unit testing support relatively early in the lifecycle. Unit testing works with your IDEs as you’d expect, but you can also build and run unit tests directly from the .NET CLI.
You may have noticed that “dotnet new” offers two different unit-testing project types: xunit and mstest. To get started, create a unit test project with your preferred unit test testing framework, for example “dotnet new xunit,” and then in your test project folder type “dotnet add reference <path to project to test>” to have the CLI add the reference to the project file for you. Once you have a unit-testing project, run your test projects from the CLI using the “dotnet test” command. Regardless of which project type you chose, both xunit and mstest projects are supported by Visual Studio and Visual Studio for Mac, as well as the CLI.
is needed for .NET Core build and debugging support.) You’re now ready to develop .NET Core projects using Visual Studio Code.
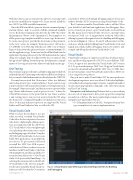
The C# extension enables Visual Studio code to call the CLI on your behalf to build and run applications for debugging. Once you’ve created your project, open Visual Studio Code and from the File menu choose Open Folder. You’ll see a prompt when you open a C# file (.cs)—a suggestion bar at the top of the editor offering to generate the required assets for building and debugging, as shown in Figure 1. Choose Yes and it will generate two files, tasks.json, which enables building from Visual Studio Code, and launch.json, which enables debugging. You’re now ready to edit, compile and debug directly from Visual Studio Code.
Visual Studio
Visual Studio continues to support a world-class developer experi- ence, and the tooling support for .NET Core is no different. .NET Core 2.0 support was introduced in Visual Studio 2017 (version 15.3). To get started writing a .NET Core 2.0 app in Visual Studio, you need to download and install the .NET Core 2.0 SDK. Once it’s on your machine, restart Visual Studio and you’ll see .NET Core 2.0 as a target for new projects.
Our goal was to make Visual Studio 2017 the most productive development experience we’ve ever offered. To hit a few highlights, we’ve added code navigation improvements, a significant number of new refactoring/quick fix commands, code-style enforcement and Live Unit Testing.
Navigation and Refactoring We know that as you’re working in your code it’s important to have great support for navigating around your code base. The most popular improvements to code navigation in Visual Studio 2017 are:
• Go To Implementation (Ctrl+F12): Navigates from any base type or member to its various implementations.
Visual Studio Code
While you have the freedom to use any editor you wish, we think Visual Studio Code offers the best experience for users who desire a lightweight editing experi- ence in conjunction with the .NET Core CLI. Visual Studio Code is our lightweight cross-platform editor with source control and debugging support built in. Using the .NET CLI with Visual Studio Code, you can build .NET applications on any platform you choose. To get started you’ll need to install the .NET Core SDK as previ- ously discussed. Once you have it on your machine, install Visual Studio Code from code.visualstudio.com, and then install the C# extension from Microsoft—C# for Visual Studio Code (powered by OmniSharp)—by selecting the extension tab on the left side of Visual Studio Code. (If you’re using F#, you’ll want to install the Ionide-fsharp ex- tension, as well. Note that the C# extension msdnmagazine.com
Figure 1 Visual Studio Code Offering to Generate Required Files for Building and Debugging
September 2017 23
