
Page 23 - MSDN Magazine, August 2017
P. 23
project is the iOS piece of the solution. B4UFly_UITEST contains scripts for UI testing, which can be done on a local computer or, ultimately, on Xamarin Test Cloud.
The Xamarin.Forms project, called B4UFly, contains cross- platform UI code written using XAML with C# codebehind and the Xamarin.Forms library. Cross-platform business logic and data access code is housed in the UTILS folder. App.cs is the initializa- tion file for the Xamarin.Forms app.
Each platform-specific project has its own startup file for the respective OS. The Android project contains a startup file called MainActivity.cs, which defines an activity class inherited from Xamarin.Forms.Platform.Android.FormsApplicationActivity.
The iOS project contains a startup file called AppDelegate, which inherits from Xamarin.Forms.Platform.iOS.FormsApplicationDelegate. Once a Xamarin.Forms project is created, development of the
UI can follow.
Dynamic Layouts
B4UFLY makes use of all of the standard Xamarin layouts, including StackLayout, AbsoluteLayout and Grid. Xamarin.Forms Layouts can also be employed to create dynamic layouts with content that changes in real time. This isn’t about data binding, although that’s possible, as well. This is about modifying the structure and appear- ance of the screens themselves.
The two most important screens in the app are the map and the status page. The map is where the flyer’s GPS position is determined, and where surrounding locations and flight restrictions and air- ports are displayed. The map is also where a pin can be dropped, in something called Planning Mode, so the flyer can determine if it’s safe to fly there.
<StackLayout x:Name="topStatusIconHolder" Orientation="Horizontal" VerticalOptions="FillAndExpand" HorizontalOptions="StartAndExpand" Padding="0, 5, 5, 0" BackgroundColor="White" >
<Image x:Name="topStatusIcon" Aspect="AspectFit" Source="Blank.png"
VerticalOptions="CenterAndExpand"
BackgroundColor="Transparent" HorizontalOptions="CenterAndExpand" HeightRequest="50" WidthRequest="50" />
</StackLayout>
Depending on the user’s flight location, the status can change to fly or no-fly. This example shows a no-fly situation and the text and icon are updated to reflect the restriction:
if (safeToFlyResult.isInForbiddenZone == true) {
topStatusTextHolder.BackgroundColor = Color.White; topStatusText.Text = "Flight Prohibited"; topStatusText.IsVisible = true;
topStatusIcon.Source = ImageSource.FromFile("no_drone_zone.png");
Showing and hiding elements begins with a XAML layout, the “DO NOT FLY” status in this case:
<StackLayout x:Name="stackForbiddenToFly" Orientation="Vertical" IsVisible="false" Padding="10, 20, 10, 5" VerticalOptions="Start">
<Label x:Name="forbiddenDoNotFlyText" Text="DO NOT FLY YOUR AIRCRAFT"
TextColor="#DA4E5B"
FontSize="22" FontAttributes="Bold" HorizontalOptions="Center" HorizontalTextAlignment="Center" />
</StackLayout>
When the status is determined to be no-fly because a location has been chosen where drone flight is prohibited, the StackLayout stackForbiddenToFly is made visible (as shown in Figure 3):
if (safeToFlyResult.isInForbiddenZone == true) {
stackForbiddenToFly.IsVisible = true; ...
The final dynamic UI approach is the physical removal of ele- ments from a layout using C# code. Here’s an example of a layout and button being removed from a layout’s collection of child elements:
stackCurrentLocationTop.Children.Remove (refreshComboStack); stackCurrentLocationTop.Children.Remove (dismissImgBtn);
The status page (Figure 3) tells the user if it’s safe to fly. There are three main statuses: yellow, orange and red. (There’s no green because of lawyers.) Each of these statuses is reflected on the status page by a different status icon, by the text in the header and the color of the header’s background, as well as the text that’s displayed on the page to explain the status. Even the ad- ditional info buttons at the bottom of the page can change. The entire status page is dynamic.
Xamarin.Forms provides several ways to change content in midstream, providing dynamic content modifiable in real time. The first way is to modify existing layouts and their elements. The second is to show and hide elements. The third way is to add and remove elements from the page using C#. B4UFLY employs all three of these approaches in the status screen.
Modifying layouts begins with a layout to modify, created using XAML in this case, though it could just as easily be created using C#. This example is a StackLayout containing a status bar at the top of the map containing a status icon called topStatusIcon:
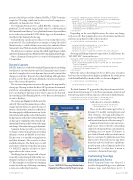
Figure 1 B4UFLY Planning Mode Helps People Find Places to Fly Their Drones
Add a layout to a layout’s children:
stackCurrentLocationTop.Children.Add (refreshComboStack, 3, 4, 0, 1);
Those are the three main approaches to dynamic UI: modify existing layouts and their elements, showing and hiding ele- ments, and adding and removing elements and layouts from layout collections using C#.
Xamarin.Forms has become an increas- ingly easier choice with the outstanding support for Xamarin.Forms customization, providing access to native UI features. A good rule of thumb is that you don’t want to have to customize (by platform) more than 20 percent to 30 percent of your app. More than that and you should use a platform- specific option, such as Xamarin.Android or Xamarin.iOS. So what does it mean to customize a Xamarin.Forms app?
Customizing Your App
Using Xamarin.Forms
Before Xamarin.Forms was released, I would code my mobile app’s cross-platform business logic and data layer in C#. I
msdnmagazine.com
August 2017 19
