
Page 41 - MSDN Magazine, July 2017
P. 41
storage in Azure. You can also take snapshots and back up the data, which you can reload in case of a failure.
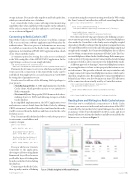
Last, Azure Redis Cache comes with important monitoring capabilities that, when enabled, provide insights on the utilization of the cache, in terms of cache hits and misses, used storage, and so on, as shown in Figure 1.
Connecting to Redis Cache in .NET
Once Redis Cache is configured in Azure, you define a unique URL to access it from a software application and obtain a key for authentication. These two pieces of information are necessary to establish a connection to the Redis Cache engine from your application. Let’s build an ASP.NET MVC application then, which stores objects in Redis Cache.
A common option for storing the cache access credentials is the Web.config file of the ASP.NET MVC application. In the <appSettings> section, you can simply add a key:
<add key="CacheConnection" value="<instance- name>.redis.cache.windows.net,abortConnect=true,ssl=false,password=<instance-key>"/>
Parameter abortConnect is set to true, which means that the call won’t succeed if a connection to the Azure Redis Cache can’t be established. You might opt for a secured connection over HTTPS by setting the ssl parameter to true.
You also need to add one of the following NuGet packages to your projects:
• StackExchange.Redis: A .NET implementation of a Redis Cache client, which provides an easy-to-use interface to Redis commands.
• Newtonsoft.Json: The popular JSON framework for dese- rializing objects to JSON and allowing storage in a Redis Cache database.
In its simplified implementation, the MVC application stores and retrieves contact details from the Redis Cache by defining CRUD actions in a Controller. If the object isn’t found in the cache, it will be restored from the database and then stored in the cache for future access.
Your Contact model is defined as follows, with a few properties to enter name, e-mail address and
country of origin:
a connection using the connection string stored in the Web.config file. Your ContactsController class will look something like this:
public class ContactsController : Controller {
static string cacheConnectionString = ConfigurationManager.AppSettings["CacheConnection"].ToString();
ConnectionMultiplexer connection = ConnectionMultiplexer.Connect(cacheConnectionString);
Now, this is far from being a good practice for defining a connec- tion to any storage system, as hardcoding the ConnectionMultiplexer class inside the Controller’s code clearly creates a highly coupled dependency. Ideally, you’d inject this dependency using an Inversion of Control library. However, for the sake of keeping things simple and straight in this example, the ConnectionMultiplexer class is all you need to obtain a connection to an instance of Redis Cache. The Con- nectionMultiplexer, defined in the StackExchange.Redis namespace, works as a factory by exposing a static Connect method, and returning an instance of itself as a live connection to the defined Redis Cache.
A different approach to sharing a ConnectionMultiplexer instance in your application is to have a static property that returns a con- nected instance. This provides a thread-safe way to initialize only a single connected ConnectionMultiplexer instance, which can be shared in a singleton class. By masking the ConnectionMultiplexer behind a Lazy object, you also obtain just-in-time (JIT) allocation of the connection when actually used by a Controller’s action:
static Lazy<ConnectionMultiplexer> lazyConnection = new Lazy<ConnectionMultiplexer>(() =>
{
return ConnectionMultiplexer.Connect(cacheConnectionString);
});
static ConnectionMultiplexer Connection => lazyConnection.Value;
Reading from and Writing to a Redis Cache Instance
Now that you’ve established a connection to a Redis Cache instance, you can access it in the read-and-write actions of the MVC Controller. The Get method of a ContactManager class checks for an instance of the object identified by its ID in cache, and if not found, will retrieve it from the database and allocate it in Redis for future access, as shown in Figure 2.
public class Contact {
public Guid Id { get; set; }
[DisplayName("Contact Name")] public string Name { get; set; }
[DataType(DataType.EmailAddress)] public string Email { get; set; }
public string Country { get; set; } }
You now add a new Contacts Controller to the application, choosing to add views using Entity Framework. As you’ll see, however, you’ll add a layer of fetching data from the cache first, before hitting the database.
Connecting to the Redis Cache, then, is purely a matter of defining
msdnmagazine.com
Figure 1 Redis Insights in Microsoft Azure
July 2017 35
