
Page 27 - MSDN Magazine, July 2017
P. 27
determining the constants that define the equation. Training is an iterative process and the demo performs 5,000 training iterations, using 120 of the 150 iris data items.
After training, the prediction model is applied to the 30 iris data items that were held out of the training process. The model had a classification error of 0.0667, which means that the model incorrectly predicted the species of 0.0667 * 30 = 2 flower items and, therefore, correctly predicted 28 items. The classification error on a holdout testsetisaveryroughestimateofhowwellyou’dexpectthemodelto do when presented with a set of new, previously unseen data items.
Next, the demo program uses the trained neural network to predict the species of a flower with features (6.9, 3.1, 4.6, 1.3). The prediction is computed and displayed in terms of probabilities: (0.263, 0.682, 0.055). Notice that the three values sum to 1.0. Because the middle value, 0.682, is the largest, the prediction maps to (0,1,0), which in turn maps to versicolor.
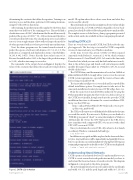
The remainder of the output shown in Figure 1 displays the values of the constants that define the neural network prediction
Figure 1 CNTK v2.0 in Action msdnmagazine.com
model. I’ll explain where those values come from, and what they can be used for, shortly.
This article makes no particular assumptions about your knowledge of neural networks, or CNTK or Python. Regardless of your back- ground, you should be able to follow along without too much trouble. The complete source code for the iris_demo.py program is presented in this article, and is also available in the accompanying download.
Installing CNTK v2.0
There are several ways to install CNTK, but I’ll describe the sim- plest approach. The first step is to install a CNTK-compatible version of Anaconda onto your Windows machine.
At the time I wrote this article, CNTK v2.0 RC1 required Anaconda (with Python 3), version 4.1.1, 64-bit, which contains Python version 3.5.2 and NumPy 1.11.1. So I went to the Anaconda Download site (which you can easily find with an Internet search), then to the archives page and found a self-extracting executable installer file named Anaconda3-4.1.1-Windows-x86_64.exe and double-clicked on it.
The CNTK library and documentation is hosted on GitHub at github.com/Microsoft/CNTK. I strongly advise you to review the current CNTK system requirements, especially the version of Anaconda, before trying to install CNTK.
The Anaconda install process is very slick and I accepted all the default installation options. You might want to take note of the Anaconda installation location because CNTK will go there, too.
By far the easiest way to install CNTK is indirectly, by using the Python pip utility program. In other words, you don’t need to go to the CNTK site to install it, though you do need to go to the CNTK installation directions to determine the correct installation URL. In my case that URL was:
https://cntk.ai.PythonWheel/CPU-Only/cntk-2.0rc1-cp35-
cp35m-win_amd64.whl
The URL you’ll want to use will definitely be different by the time
you read this article. If you’re new to Python, you can think of a .WHL file (pronounced “wheel”) as somewhat similar to a Windows .MSI installer file. Notice the CPU-Only part of the URL. If you have a machine with a supported GPU, you can use it with a dual CPU-GPU version of CNTK.
Once you determine the correct URL, all you have to do is launch an ordinary Windows command shell and type:
> pip install <url>
Installation is very quick, and files are placed in the Anaconda direc- tory tree. Any install errors will be immediately and painfully obvious, but you can check a successful installation by typing the following at a command prompt and you should see the CNTK version displayed:
> python -c "import cntk; print(cntk.__version__)"
Understanding Neural Networks
CNTK operates at a relatively low level. To understand how to use CNTK to create a neural network prediction model, you have to understand the basic mechanics of neural networks. The diagram in Figure 2 corresponds to the demo program.
The network input layer has four nodes and holds the sepal length and width (6.9, 3.1) and the petal length and width (4.6, 1.3) of a
July 2017 23
