
Page 36 - MSDN Magazine, June 2017
P. 36
When you click Create, Mobile Center will generate a table with a number of system columns, which you can see by selecting the Show system columns switch control or when you click Edit Schema to add your columns, as shown in Figure 2.
Columns can be of five different types: String, Date, Number, Boolean and Version. Actually, Version is only intended for inter- nal usage with the version column. These types are very flexible because they can receive a variety of platform-specific data types. For instance, in the Microsoft
Microsoft Account, Facebook, Google and Twitter. You can definitely select multiple authentication services, but for this example, use the Microsoft Account service. Whatever authentication service you click, a popup appears showing a link to the documentation for each provider and a list of fields that must be configured based on the selected pro- vider. In the case of the Microsoft Account service, the documentation (available at bit.ly/2peCBgf) explains how to register an app and how to retrieve the app ID and app client secret through the following steps:
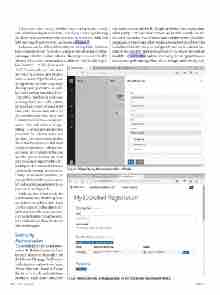
.NET Framework, you can store objects of type Int32 and Double into a column of type Number, and this applies to the other supported development platforms, as well. It’s worth noting that using Date- TimeOffset for dates is preferred to using DateTime, as the former includes and takes into account time zone information, whereas the latter does not. Now, click Add Column and add two simple col- umns: Title and Author (of type String). A popup appears and lets you enter the column name and the data type. Once you’ve added the desired columns, an additional step is required to set column per- missions. To accomplish this, you use the options button (an icon with three dots aligned vertically), which provides a menu with several commands. Among the others, the Change Permissions command lets you specify individual permissions for each operation against data, as you can see in Figure 3.
Click on Save when ready. It’s worth mentioning that the options menu lets you upload data from .csv files, as well as clear data in the table and delete the table. Another very useful feature is that the page for a table will also show the stored data inside a grid.
Setting Up
Authentication
The next step is to set up authenti- cation. In Mobile Center, click the Identity button in the toolbar on the left side of the page. You’ll see the authentication endpoint for Azure Active Directory (Azure AD) and the list of available authentication providers: Azure Active Directory,
Figure 3 Specifying Permissions for a Table
32 msdn magazine
Xamarin
Figure 4 Registering an Application in the Microsoft Developer Portal
