
Page 24 - MSDN Magazine, June 2017
P. 24
(BeginRemoteCommandHandling of the CloudHelper class). Again, I use the task-based asynchronous pattern:
private void BeginRemoteCommandHandling() {
Task.Run(async () => {
while (true) {
var message = await deviceClient.ReceiveAsync();
if (message != null) {
await HandleIncomingMessage(message); }
} });
}
This method is responsible for creating a task that continuously analyzes messages received from the cloud endpoint. To receive a remote message, you invoke the ReceiveAsync method of the DeviceClient class. ReceiveAsync returns an instance of the Message class, which you use to obtain a raw byte array containing JSON-formatted remote com- mand data. You then deserialize this array to the RemoteCommand object (see RemoteCommand.cs in the AzureHelpers folder), which is implemented in the MessageHelper class (the AzureHelpers subfolder):
public static RemoteCommand Deserialize(Message message) {
ArgumentCheck.IsNull(message, "message");
var jsonData = Encoding.UTF8.GetString(message.GetBytes());
return JsonConvert.DeserializeObject<RemoteCommand>( jsonData);
}
RemoteCommand has several properties, but you
typically use just two: name and parameters, which
contain the command name and command param-
eters. In the RemoteCamera app, I use these values to determine if an expected command was received (see Figure 11). If so, I raise the UpdateCameraPreviewCommandReceived event to pass that information to listeners, then I inform the cloud that the command was accepted using the CompleteAsync method of the DeviceClient class. If the command isn’t recognized, I reject it using the RejectAsync method.
The UpdateCameraPreviewCommandReceived event is handled in the MainPage class. Depending on the parameter value I obtain from the remote command, I either stop or start the local camera preview. This operation is again dispatched to the UI thread, as shown in Figure 12.
Sending Commands from the Cloud
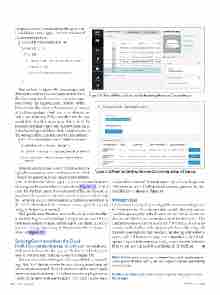
Finally, I show that the solution portal can be used to remotely con- trol your IoT device. For this, you use the Devices tab, where you need to find and then click your device (see Figure 13).
This activates a device details pane, where you click the Commands hyperlink. You’ll then see another form that allows you to choose and send a remote command. The particular layout of this form depends on the command you choose. Here, I have only one single-parameter command, so there’s only one checkbox. If you clear this checkbox,
Figure 13 The IoT Portal Devices Tab Showing RemoteCamera Details
Figure 14 A Form for Sending Remote Commands to the IoT Device
and send the command, RemoteCamera app will stop the preview. All commands you send, along with their status, appear in the com- mand history, as shown in Figure 14.
Wrapping Up
I showed how to set up the preconfigured remote monitoring Azure IoT Suite solution. This solution collects and displays information about images acquired with the webcam attached to the remote device, and also lets you remotely control the IoT device. The companion source code can run on any UWP device, so you don’t actually need to deploy it to the Raspberry Pi. This article, along with the online documentation for the remote monitoring solution and its source code, will help you to jump-start comprehensive IoT devel- opment for practical remote monitoring. As you see, with Windows 10 IoT Core, you can go far beyond simple LED blinking. n
DawiD Borycki is a software engineer and biomedical researcher, author and con- ference speaker. He enjoys learning new technologies for software experimenting and prototyping.
Thanks to the following Microsoft technical expert for reviewing this article: Rachel Appel
20 msdn magazine
Internet of Things
