
Page 78 - MSDN Magazine, May 2017
P. 78
Modern Apps FRANK LA VIGNE Deep Dive into the Map Control
In my column last month, I demon- strated the basic features of the Bing Maps Control for Universal Windows Platform (UWP) apps andhoweasyitistoaddamapto your UWP apps. This month I’ll show you how to leverage some of the more advanced features that will make your apps really stand out and provide great experiences for your users. I’ll also explore how to embed the rich imagery and 3D experience of Bing Maps directly into your apps.
Getting Started
For an in-depth look at how to add the Map control and obtain a MapServiceToken, please refer to my column last month (msdn.com/ magazine/mt797655). For the purposes of this column, create a new blank UWP project in Visual Studio by choosing New Project from the File menu. Then expand to Installed Templates | Windows | Blank App (Universal Windows). Name the project DCTourismMap and then click OK. Immediately afterward, a dialog box will appear asking you which version of Windows the app should target. For this project, the default options will be fine, so you can simply click OK. In the Main- Page.xaml file, add the following namespace declaration to the Page tag:
xmlns:maps="using:Windows.UI.Xaml.Controls.Maps"
Next, add the Map control to the page, by adding the follow- ing XAML in the Grid control on the page (be sure to insert the MapServiceToken value you received from the Bing Maps Portal at bingmapsportal.com):
<maps:MapControl x:Name="mapControl" MapServiceToken="{Insert Key Here}" > </maps:MapControl>
You may now run the solution and you should see a Map control covering the entire screen of your app. With this control in place, you can now begin to take advantage of all that the Bing Maps control for UWP has to offer.
Custom Map Markers
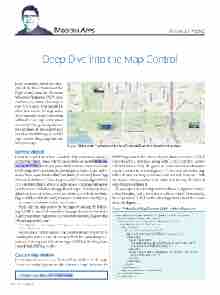
In my last column, I wrote about adding markers to the map. The markers simply pinpoint a location on a map. However, the
Figure 1 Map with Customized Button Controls Placed at Specified Location
UWP Map control also lets developers place customized XAML controls onto a map and, along with XAML controls, comes enhanced interactivity. The goal is to create a map that showcases various landmarks in Washington, D.C. The markers on the map will each have an image of the location and will bring up a Web site about it when you click on it. In the end, the map should look something like Figure 1.
To accomplish this, the Map control will need a MapItemsControl, a DataTemplate, and a few other attributes added. First, modify the Map control XAML in the MainPage.xaml to look like what’s shown in Figure 2.
Figure 2 Modified Map Control XAML in MainPage.xaml
<maps:MapControl x:Name="mapControl" Loaded="mapControl_Loaded" MapServiceToken="[Insert Key Here]">
<maps:MapItemsControl x:Name="sitesMapItemsControl" >
<maps:MapItemsControl.ItemTemplate> <DataTemplate>
<Button Click="itemButton_Click" maps:MapControl.Location="{Binding Location}" > <StackPanel>
<Border Background=
"{ThemeResource ApplicationPageBackgroundThemeBrush}"> <TextBlock Text="{Binding Name}"/>
</Border>
<Image Source="{Binding ImageUri}" Width="100" Height="50"
Stretch="UniformToFill"> </Image>
</StackPanel> </Button>
</DataTemplate> </maps:MapItemsControl.ItemTemplate>
</maps:MapItemsControl> </maps:MapControl>
Code download available at Bit.ly/MapControl.
72 msdn magazine
