
Page 60 - MSDN Magazine, May 2017
P. 60
You create a timer that will turn on each LED in an interval set by the intervals array (in your case, 6s, 2s and 6s). The ellipses in the screen have their opacity set to 0.5, so they appear dimmed and each one will be set to 1 when the light is on. The timer will only be set if you can set the GPIO for the board, in the InitGPIO function, as shown in Figure 8.
Figure 6 Main Page xaml Code, Showing Traffic Lights
<Grid Background="{ThemeResource ApplicationPageBackgroundThemeBrush}"> <Border BorderBrush="Black" BorderThickness="3" HorizontalAlignment="Center"
VerticalAlignment="Center" CornerRadius="5">
<StackPanel HorizontalAlignment="Center" VerticalAlignment="Center">
<Ellipse Width="50" Height="50" Fill="Red" Opacity="0.5" Margin="20,20,20,10" x:Name="RedLed" Stroke="Black" StrokeThickness="1"/>
<Ellipse Width="50" Height="50" Fill="Yellow" Opacity="0.5" Margin="20,10,20,10" x:Name="YellowLed" Stroke="Black" StrokeThickness="1"/>
<Ellipse Width="50" Height="50" Fill="LimeGreen" Opacity="0.5" Margin="20,10,20,20" x:Name="GreenLed" Stroke="Black" StrokeThickness="1"/>
</StackPanel> </Border>
</Grid>
Figure 7 Source Code to Turn on Traffic Lights at Specified Intervals
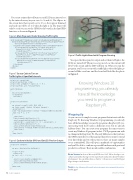
Figure 9 Traffic Lights Board with Program Running
You open the three pins for output and set them to High so the LEDs are turned off. When you set a pin to Low, the current will flow by the circuit and the LED will turn on. When you run the program, you’ll see a screen with a traffic light, where the lights go on and off like a real one, and the board will look like the photo in Figure 9.
Knowing Windows 10 programming, you already have all the knowledge you need to program a Raspberry Pi.
Wrapping Up
As you can see, it’s simple to create programs that interact with the Raspberry Pi. Knowing Windows 10 programming, you already have all the knowledge you need to program a Raspberry Pi (yes, interacting with the board is a different story, but it’s already halfway done). You can create your programs the same way you create any Windows 10 program (in fact, UWP programs run with no change in the Raspberry Pi). The only difference is that you have the GPIO controller to set data and get data. If you want to extend your knowledge and try other projects, there are many samples to try at bit.ly/2llecFZ. This will open a multitude of opportunities and you’ll be able to combine a powerful hardware with great and productive software. That’s an unbeatable combination. n
Bruno Sonnino has been a Microsoft MVP since 2007. He’s a developer, con- sultant, and author, having written many books and articles about Windows development. You can follow him on Twitter: @bsonnino or read his blog at blogs.msmvps.com/bsonnino.
ThankS to the following Microsoft technical expert who reviewed this article: Rachel Appel
private int _currentLight;
private DispatcherTimer _timer;
private int[] _pinNumbers = new[] { 22, 9, 19 }; private GpioPin[] _pins = new GpioPin[3];
public MainPage() {
this.InitializeComponent(); if (InitGPIO())
InitTimer(); }
private void InitTimer() {
var intervals = new[] { 6000, 2000, 6000 };
var lights = new[] { RedLed, YellowLed, GreenLed };
_currentLight = 2;
_timer = new DispatcherTimer { Interval = TimeSpan.FromMilliseconds(500) }; _timer.Tick += (s, e) =>
{
_timer.Stop();
lights[_currentLight].Opacity = 0.5; _pins[_currentLight].Write(GpioPinValue.High);
_currentLight = _currentLight == 2 ? 0 : _currentLight + 1; lights[_currentLight].Opacity = 1.0; _pins[_currentLight].Write(GpioPinValue.Low);
_timer.Interval = TimeSpan.FromMilliseconds(intervals[_currentLight]); _timer.Start();
};
_timer.Start(); }
Figure 8 Code to Initialize GPIO and Set LED Pins for Output
private bool InitGPIO() {
var gpio = GpioController.GetDefault();
if (gpio == null) return false;
for (int i = 0; i < 3; i++) {
_pins[i] = gpio.OpenPin(_pinNumbers[i]); _pins[i].Write(GpioPinValue.High); _pins[i].SetDriveMode(GpioPinDriveMode.Output);
}
return true; }
54 msdn magazine
Internet of Things
